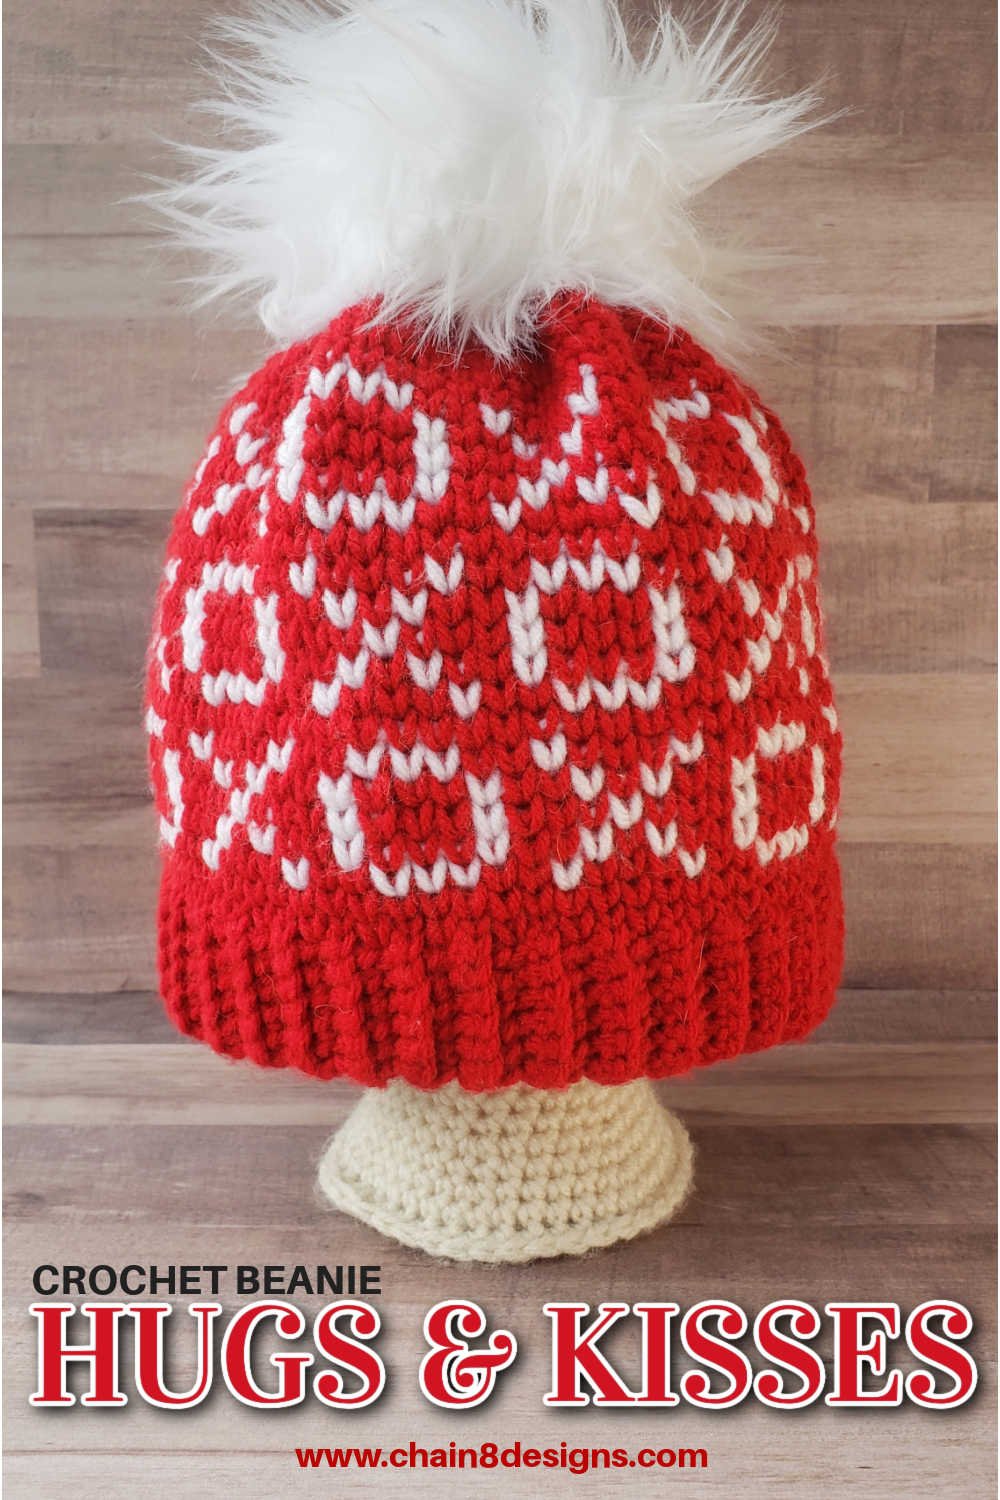
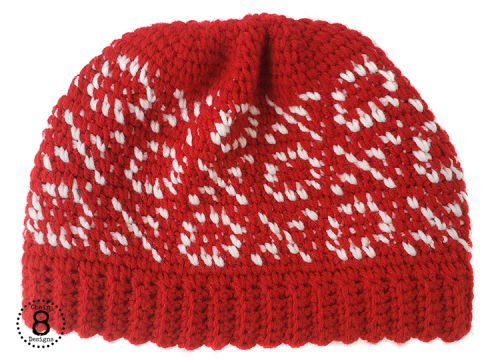
It’s that time of year again, the annual Chain 8 Designs’ Valentine’s Day hat pattern. This is my way of saying thank you to everyone who has supported Chain 8 Designs throughout the last year. I know that the last year has been hard for so many people around the world and I hope this pattern can bring you a little joy. I really appreciate all the love and support that I that I received from everyone this last year and I want to pass on a little love.
This year I went with something a little different and did a hat that doesn’t have hearts. Shocking I know! LOL. With social distancing being a part of our new normal, I thought that we could all use some kisses and hugs. I hope that you like it and I you have a fabulous Valentine’s Day!
Now on to the important stuff…
What stitch is this? Is this knit or crochet?
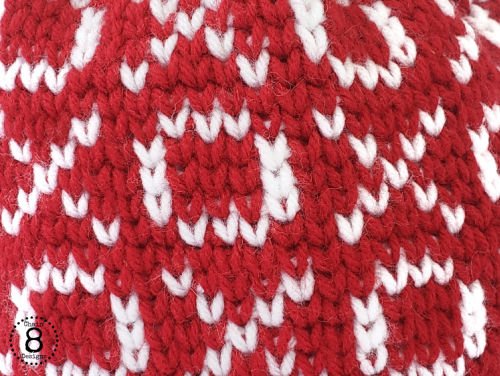
The stitch used for this beanie is the CROCHET waistcoat stitch. Yes, you heard me right…there is a crochet stitch that looks just like knit.
You might see this stitch called waistcoat, fair isle or simply the knit stitch but whatever you want to call it, this baby can create some beautiful items!
If you can make a single crochet, you can make a waistcoat stitch. The reason being, a waistcoat stitch IS A SINGLE CROCHET, just worked in a different spot. Did your mind just blow? Yep, this beautiful little stitch is just a simple single crochet.
You do have to work loosely with this stitch. Getting the proper tension can take a little getting used to, but once you do, you’ll be hooked! Pun 100% intended!
Check out my full waistcoat stitch tutorial for a complete explanation of how to make the stitch, change colors, work from a graph, and much more.
What sizes can I make?
What features does this hat have?
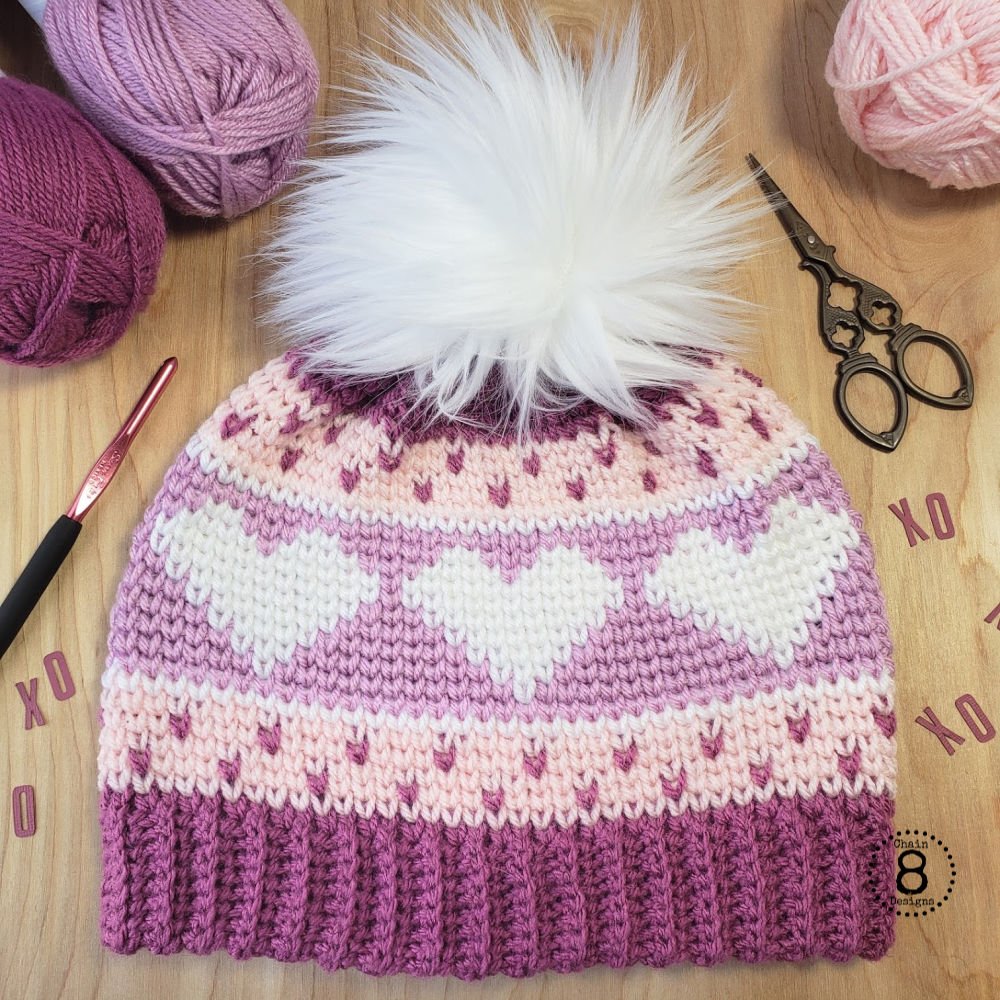
This pattern is for a fitted beanie, with no slouch. Because of the nature of the stitch, there is very little stretch. The hat is also a thicker beanie with a double brim that will keep your noggin extra warm.
The finished measurements are: Circumference = approx. 22 1/2″ [11″ when measured flat]Top to Brim Edge = approx. 8 1/2 If you need a size that is a little larger or smaller than the one stated, once you have completed the gauge swatch, increase or decrease your hook size by one or two.
WOULD YOU LIKE AN EASILY PRINTABLE/DOWNLOADABLE VERSION OF THIS PATTERN? NO ADS OR COMMENTS.
Make sure to read through all the information for each individual section before you start that section.
The main body of the hat is made using the waistcoat stitch.
If you are unfamiliar with the waistcoat stitch, please read my Waistcoat Stitch Tutorial at chain8desings.com before you begin.
DO A GAUGE SWATCH!I would not skip this step. Not all worsted weight yarn is created equal, so make sure to do a gauge swatch to ensure proper fit.While you might not need to do the gauge swatch for the brim, I would definitely do one for the waistcoat stitch.
Make sure that you are working LOOSELY.This applies to both the band and the body of the hat. Waistcoat stitches are much easier to construct when your hook can easily slide into the stitches.
You want to keep your tension even throughout.This will help with achieving the correct size and keep your stitches looking consistent. I find that my tension tends to get tighter as I work, so be mindful of that.
If you find that you need a size a little larger or smaller than the sizes listed, once you have completed the gauge swatch, increase or decrease your hook size by one or two to achieve a smaller or larger size.
BRIM
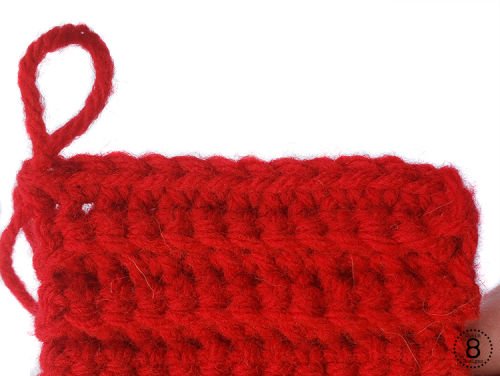
CH 14
Row 1: SC in BLO in 2nd CH from hook; SC in BLO in the next 12; CH 1; turn (13) Row 2 – 71:SC in BLO of all; CH 1; turn (14) Row 72: SC in BLO of all (14)
The upstretched band should measure approximately 17 1/4″.
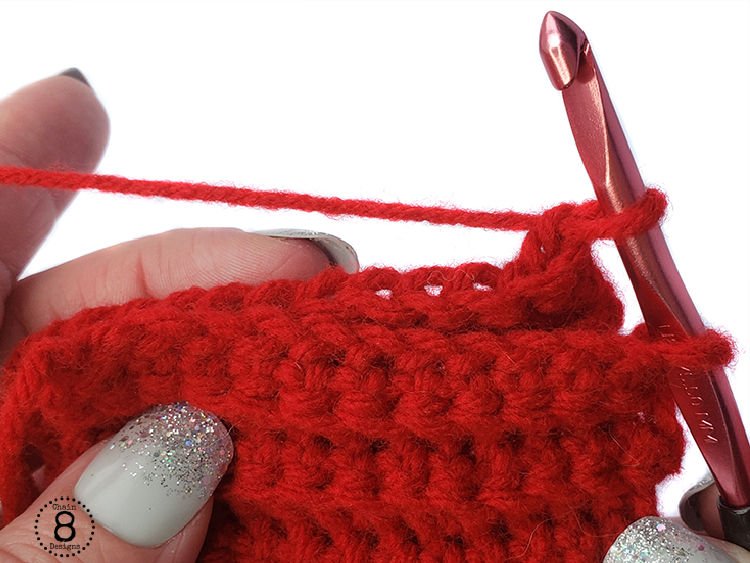
How to Join the Ends
Once you have completed the brim rows, it is time to join the ends together to make the brim circular.
With the right side on the inside, bring the two short ends together (your working loop should be in the back). Insert your hook in the first stitch and pull the loop through, YO, pull through the loop. Now SC the rest of the stitches.You will have a total of 13 stitches.
Foundation Row Here We Go!
Now we will be running one row of single crochet around the edge of the hat brim.This will be the foundation row that our waistcoat stitches will be built upon and will join the two layers of the brim together.
This row is NOT represented on the chart.
Make sure that you are crocheting through both layers of the brim.
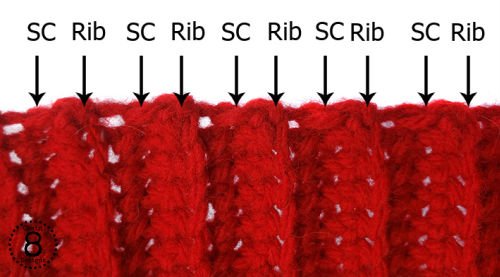
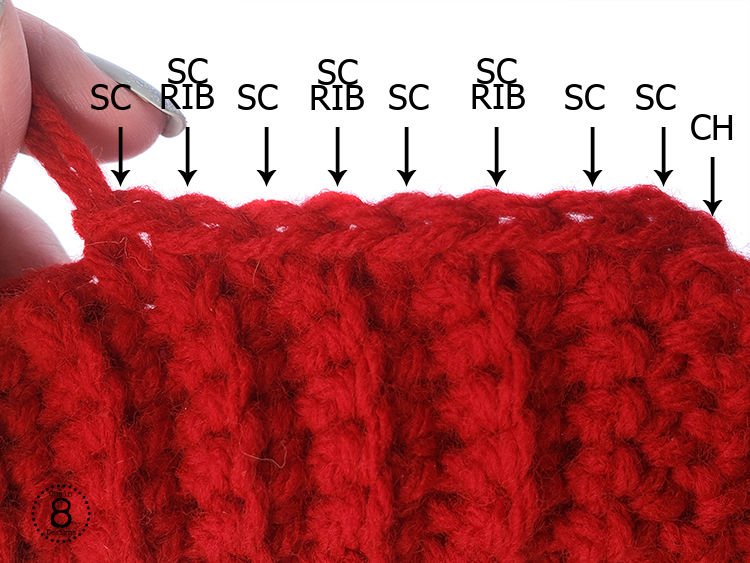
To avoid having any large holes between the brim and single crochet foundation row, we will be single crocheting into the top stitch of each rib and then placing one (1) single crochet between the ribs.There are two spaces between each rib that you can place your single crochet, pick which one you would like to use, and keep it consistent throughout.I personally use the one closest to the rib I just crocheted.
To create the double layered brim, flip the seam to the inside, then fold the band in half (long sides together). It might be helpful to place a few stitch markers to keep the two layers together as you crochet.
Joining the Double Band
CH 1; place 2 separate SC before the first rib; [*SC into top stitch of the rib; SC between rib]; repeat [*] until the end; SL st; CH 1 (72)
Want to see a plethora of crochet patterns from all over the web?
Follow me on Pinterest! <br
Patterns are broken down into categories to make finding new and exciting patterns super easy.
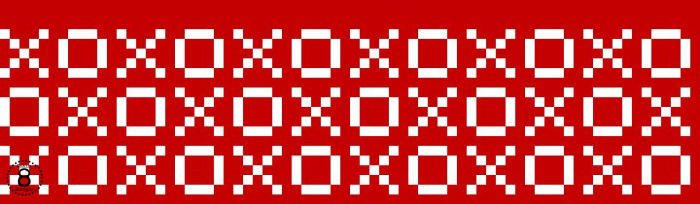
WORKING FROM THE CHART
Now that the brim and foundation row of single crochets are complete, it is time to start working from the chart.Please read all the notes and information below before you begin.
NOTES:
You will work the chart from right to left and bottom to top. The chart starts at 1/1.
Each square of the chart represents one (1) waistcoat stitch.
Work LOOSELY and keep your tension even throughout. Your hook should easily slide into the stitches.
Make sure that you are crocheting into the “Vs” of the previous row and not under the two loops that you usually would for a single crochet.
As you are working, it is helpful to lay the beanie flat from time to time and check that the sides are straight up and down.If you find that the sides are starting to creep inward, you have started crocheting too tightly.
Crochet over your yarn carries.This will give the inside of the hat a nice and tidy look.Do not pull the carries too tightly.
Joining Rows
The hat is worked in joined rows.
Rows are joined with a SL st, then CH 1 to start the next row.
The SL st is placed into the top (aka under the two loops) of the first stitch of the row. The first waistcoat stitch of the next row will be placed into the “V” of the same stitch you slip stitched to.
Pull both the SL st and CH 1 tightly.This will help create a well-hidden seam
All the SL st and CH stitches are made in the main color.
Color Changes
Color changes are worked just as you would a SC color change.
On the last stitch before the color change, insert your hook into the stitch and pull up a loop. Instead of yarning over and pulling through the two loops, you will be pulling the new color through the loops instead.Now you can continue with your new color.
The Chart
The chart starts at 1/1 in the bottom right-hand corner.
Remember that our foundation row of single crochet is NOT represented on the chart. Your first row will be a full row of the main color waistcoat stitches; on row 2 you will start switching colors.
Follow the chart until complete.
Download a copy of the chart below. The chart has both the line and row numbering.
Now that you have finished the chart it is time to close up the hat.
You might have a tendency to start working tighter once you get to this section, but don’t, make sure to keep your tension loose.
When you get to the second round of decreases, make sure that you are going through both stitches of the WS2tog of the previous row. It helps if your hook enters the stitches horizontally so you can ensure that you are going through both stitches [see picture].
Decreasing Rows
Row 22: CH 1; [*WS next 4; WS2tog]; repeat [*] till end; SL st; CH 1 [60]Row 23: [*WS next 3; WS2tog]; repeat [*] till end; SL st; CH 1 [48]Row 24: [*WS next 2; WS2tog]; repeat [*] till end; SL st; CH 1 [36]Row 25: [*WS; WS2tog]; repeat [*] till end; SL st; CH 1 [24]Row 26: [*WS2tog;]; repeat [*] till end; SL st; CH 1 [12]
On this last row, you will want to work your stitches tightly. Being that this is the last row, we are not worried about having to fit our hook into the stitches so crochet as tightly as you can. This will help when we go to close the hole the rest of the way.
Row 27: [*WS2tog;]; repeat [*] till end; SL st; fasten off leaving 18″ tail [6]
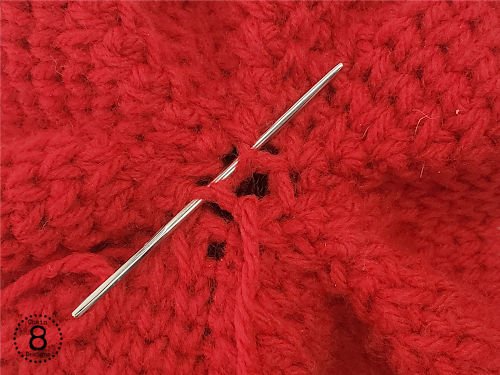
Closing the Hole the Rest of the Way
Now that we are finished with the crochet portion of our hat, it is time to close the hole the rest of the way.
Take your yarn needle and run it under and over the posts from the last row [pic 1], then pull to close [pic 2].
You will notice that there are still some larger holes left from the previous row.Now, insert your needle through both of the stitches of the WS2tog stitches [pic 3].Do this all the way around and pull the hole closed. I have found that to keep the hole closed tightly, it helps to go through your WS2tog stitches twice.
Once that is done you should have a nice, neat closure [pic 4].Fasten off, weave in the ends, and you are done.At this point, you can add a pompom for added pizazz or leave it as is.
Picture #1
Picture #2
Picture #3
Picture #4
The last thing to do to finish off your hat is to weave in all your ends. At this point you are done but if you want to add some extra pizzazz, you can add a fun pom pom.
I hope you have enjoyed this year’s Valentine’s Day pattern. The Valentine’s Day hats are always one of my favorites to design each year. I would love to see your makes. Please use #chain8designs on Instagram so I can see. I always love seeing the color combinations that everyone comes up with.
I hope that everyone has a loved filled Valentine’s Day. Till next time…HAPPY HOOKING!
**Feel free to make and sell items that are made from this pattern. Please link back to the pattern on any online sales or include my web address on tags for any in-person sales. Please do not republish or distribute any of the pictures or patterns, in any form, from this site without permission from me. Please e-mail me for any inquiries.**


Add a Comment