Add a Touch of Boho Vibes To Your Home With This Cute Crochet Pillow Cover!
The '70s are back!
’70s decor has made a major comeback in the last few years. You can find so many things in rattan, macramé, earth colors, and the plants (oh the plants!). Now this is not your parents ’70s decor, this is ’70s decor with a glow up. No olive-green appliances here (I once live in a house with an olive-green stove. LOL).
I was a born in the late ’70s so I’m no stranger to ’70s home decor. I remember our house having a ton of plants hanging from macramé hangers, a rust colored couch, etc. Our house now has a very boho/eclectic vibe and has a lot of the same elements as my early childhood home. The walls and couches are a neutral color and then there are pops of color in our decor pieces. We also have a lot of texture in everything, nubby pillows and blankets, woven baskets, wood, pretty much anything that makes you want to touch it. My husband complains that I touch everything in the store, but I’m a texture girl, what can I say.
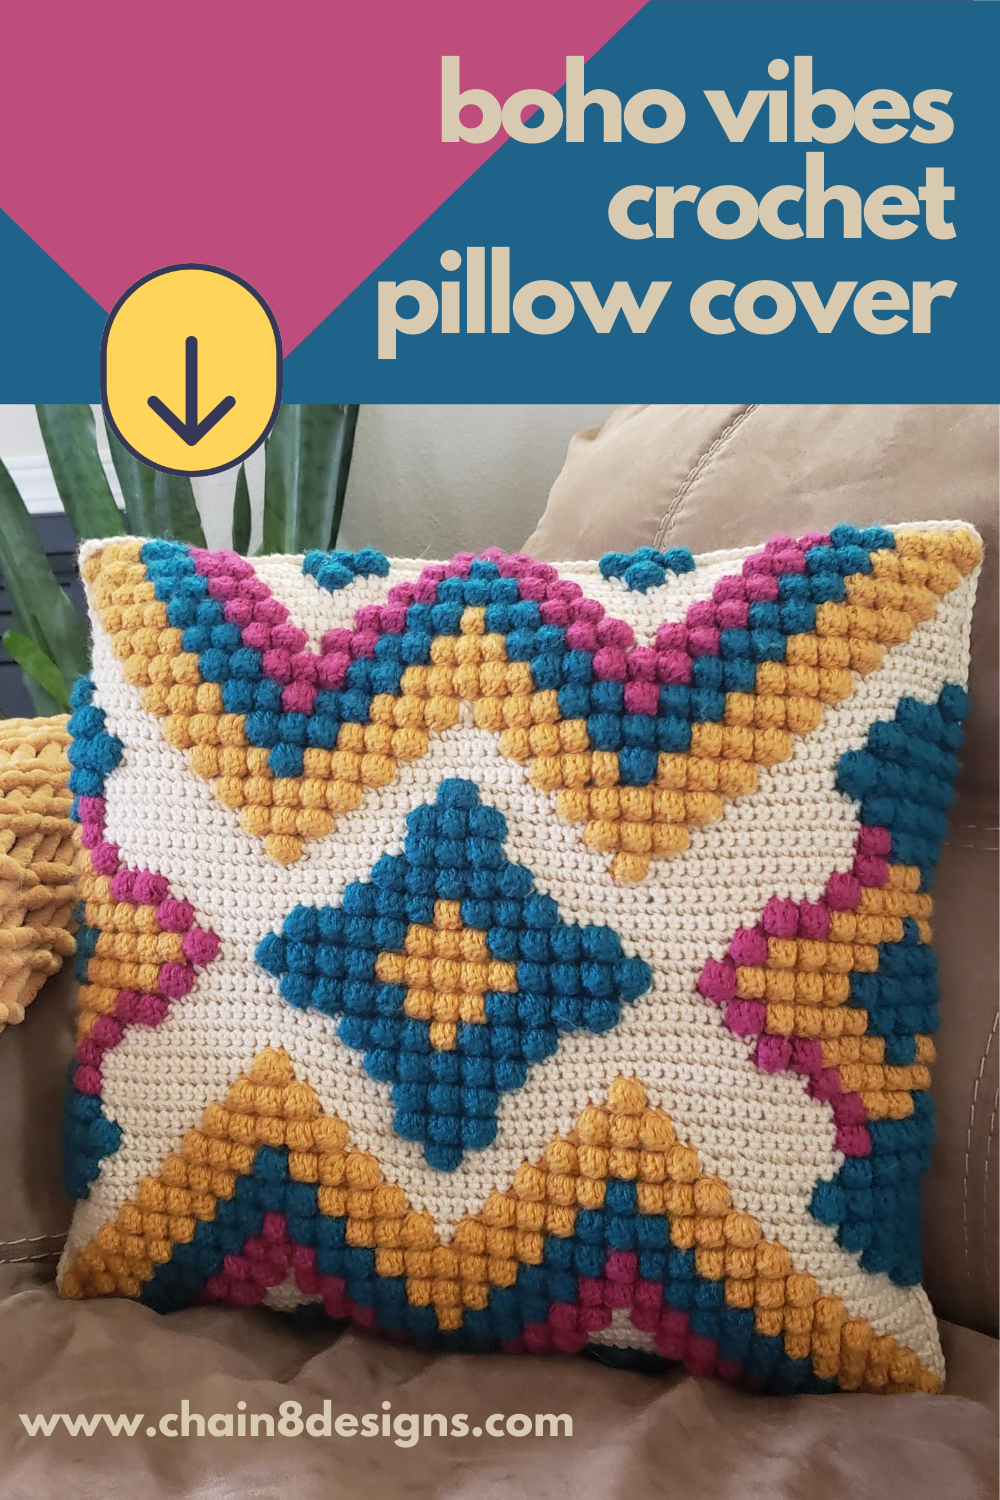
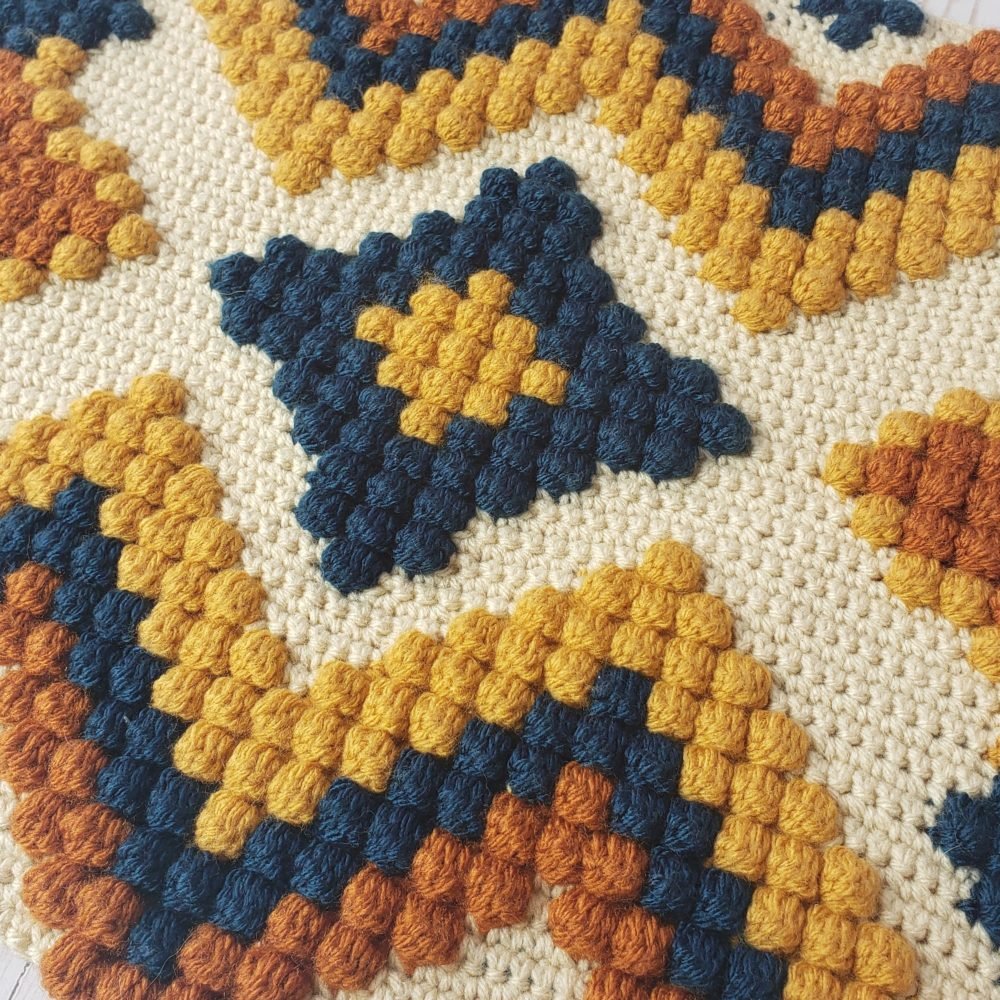
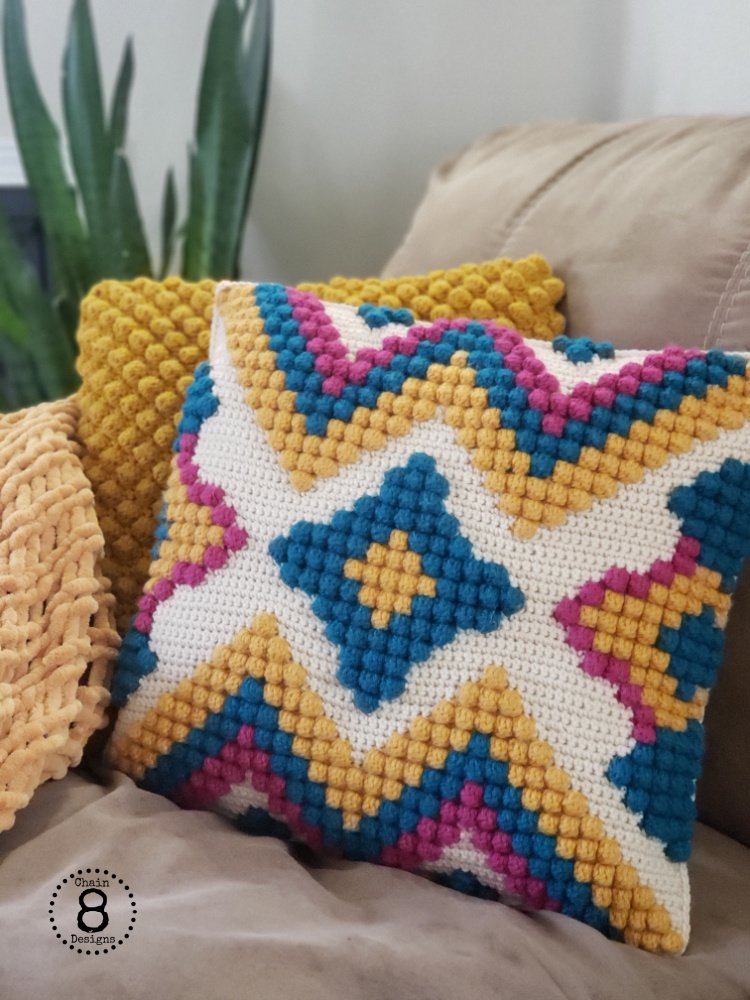
We had recently gotten a couple new rugs and I thought it was time for some new pillows. I knew that I wanted something that would coordinate with the new rugs and had a very boho/70’s vibe. This is the pillow that emerged. I made the blue/gold/brown version first (which is still my favorite) but it didn’t go as well with the new rugs so I made the magenta/gold/teal one and it’s a great compliment to the colors in the rugs.
What colors should I use?
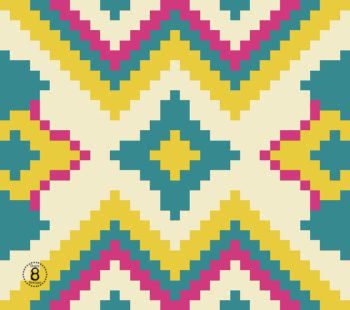
This pillow is made with three accent colors and one background color. I have also included two different color placement charts. It will depend on which colors you want to be most prominent, on which chart you choose.
Depending on the colors you use, it can change the vibe of this pillow. While the colors of the blue/gold/brown version remind me of the ’70s, the magenta/gold/teal colors remind me of Mexico. The color combinations you can use are endless.
I would suggest that when you are picking colors that you not only choose different colors but pick colors that are tonally different. Say you want to do pink, blue and purple…you might want to do a light pink, a medium blue, and a dark purple. This helps the colors really stand out from one another. If the colors are too close tonally, from afar, they might look like one color.
What is that stitch?
This pillow is made with a combination of bobble stitches and single crochets. Because the background is all single crochets, the colored bobble stitches really stand out and give the pillow a great nubby texture. If you have never made bobble stitches before or worked from a chart, there is a link below to my Bobble Stitch Tutorial. It is one of my all-time favorite stitches and I use it for a lot of my pillow patterns. You can’t beat the texture it gives.
Why would I want a pillow cover and not a traditional pillow?
The main reason is…CLEANING! You can easily pop the cover off and throw it in the washing machine. I would suggest putting it inside a knotted pillowcase first to reduce pilling and then lay flat to dry. If you have any kiddos, we all know how little sticky fingers seem to touch everything, so being able to easily clean the cover is a real bonus!
Another advantage of a pillow cover is that it reduces the number of pillows you have laying around. If you’re like me, you switch out your pillows for the holidays and that can amount to having a lot of pillows to store. With a cover you can use the same pillow insert and switch out the cover easily. It’s also a great way to use a pillow that you no longer like (gotta love a recycle/reuse moment), throw a cover on it and voile you’ve got yourself a new pillow!
WOULD YOU LIKE AN EASILY PRINTABLE/DOWNLOADABLE VERSION OF THIS PATTERN?
NO ADS OR COMMENTS.
PURCHASE A COPY ON RAVELRY TODAY!
The downloads help to support this site and make it possible for me to continue to bring you free patterns.
Thank you for your support!

BOHO VIBES CROCHET PILLOW COVER
DISCLAIMER: This post may contain affiliate links. I receive a small percentage from any purchases you may make (at no cost to you.)
NOTES:
The pillow is made up of three coordinating colors and a background color. The sheer number of color combinations that you can use is endless. Let your creativity go wild!
For the purpose of this pattern, I will be using the Magenta, Gold, & Teal version as the example.
MATERIALS:
- 1 Skein Each of Worsted Weight Yarn in Three Different Colors
[Preferably different in color AND tone.] - 4 Skeins Worsted Weight Yarn in Background Color
- Size G Hook [4.00 mm]
- Yarn Needle
- 18″ x 18″ Pillow Form
- (7) 7/8″ Buttons in a Color Similar to Background Yarn
- Scissors
- Stitch Markers [optional]
ABBREVIATIONS:
- Bob = Bobble
- CH = Chain
- SC = Single Crochet
- SK = Skip Stitch
- SSCF = Seamless Single Crochet Finish
- YO = Yarn Over
- [C] = Cream
- [G] = Gold
- [M] = Magenta
- [T] = Teal
GAUGE:
- 17 SC x 18 Rows = 4″ x 4″
FRONT COVER
For the front cover you will be following the chart below. As you will see the color placement is slightly different on each. It is up to you which chart you would live to work from. Remember that for this tutorial I am working with the magenta/gold/teal chart. You can download a copy of each chart below, which include grid lines and row numbering.
The front cover is made using the bobble stitch. If you have never worked with the bobble stitch before or need a refresher, please see my Bobble Stitch Tutorial.
NOTES:
- The bobbles are a 5 double crochet bobble.
- The chart is worked bottom to top, starting in the bottom right-hand corner at 1/1.
- Because this pattern makes use of both bobble stitches and single crochets, it is important to remember that the background is ALL SC. Even if you are working on a bobble row, all the background color stitches will be SC. It can be easy to get in the groove of doing bobbles and the next thing you know you have bobbled the whole row…I have done it more than I’d like to admit. LOL
- Each square on the chart represent one bobble stitch. So, remember for the background sections, each square represents 4 SC [2 on the SC row and the 2 on the bobble row].
- For color changes: I carry my yarn in the back and crochet over the carries (if the color change is not over too many stitches, say 2 or 3). If your color isn’t going to be repeated for quite a few stitches, it is easier and wastes less yarn if you work with two, three, or even four different sets of the same color.
I will walk you through a few rows to help get you started.
[Remember that I am working from the gold/magenta/teal chart.]
CH 71 [with Gold]
Row 1/1: [G] Starting in the 2nd CH from the hook, SC 6; [T] SC 4; [M] SC 4; [C] SC 6; [T] SC 6; [C] SC 6; [M] SC 6; [C] SC 6; [T] SC 6; [C] SC 6; [M] SC 4; [T] SC 4; [G] SC 6; CH 1; turn (70)
Row 1/2: [G] (Bob, SC) x3; [T] (Bob, SC) x2; [M] (Bob, SC) x2; [C] SC 6; [T] (Bob, SC) x3; [C] SC 6; [M] (Bob, SC) x3; [C] SC 6; [T] (Bob, SC) x3; [C] SC 6; [M] (Bob, SC) x2; [T] (Bob, SC) x2; [G] (Bob, SC) x3; switch to [C]; turn (70)
Row 2/1: [C] SC 2; [G] SC 6; [T] SC 4; [M] SC 4; [C] SC 6; [T] SC 2; [C] SC 6; [M] SC 4; [T] SC 2; [M] SC 4; [C] SC 6; [T] SC 2; [C] SC 6; [M] SC 4; [T] SC 4; [G] SC 6; [C] SC 2; CH 1; turn (70)
Row 2/2: [C] SC 2; [G] (Bob, SC) x3; [T] (Bob, SC) x2; [M] (Bob, SC) x2; [C] SC 6; [T] (Bob, SC) x1; [C] SC 6; [M] (Bob, SC) x2; [T] (Bob, SC) x1; [M] (Bob, SC) x2; [C] SC 6; [T] (Bob, SC) x1; [C] SC 6; [M] (Bob, SC) x2; [T] (Bob, SC) x2; [G] (Bob, SC) x3; [C] SC 2; CH 1; turn (70)
Continue to follow the chart until you have the front cover completed; weave in ends.
LARGE BACK PIECE
CH 71 [with Cream]
Row 1: SC in 2nd CH from hook; SC next 69; CH 1; turn (70)
Row 2-69: SC all; CH 1; turn (70)
Row 70: SC 4; [*CH 2; SK 2; SC 8]; repeat [*] until there are 6 stitches left; CH 2; SK 2; SC 4; CH 1; turn (70)
Row 71: SC in all; CH 1; turn (70)
Row 72: SC in all; fasten off; weave in ends (70)
SMALL BACK PIECE
CH 71 [with Cream]
Row 1: SC in 2nd CH from hook; SC next 69; CH 1; turn; (70)
Row 2-9 SC all; CH 1; turn (70)
Row 10: SC all; fasten off; weave in ends (70)
ASSEMBLY
Attaching the Small Back Piece:
- Begin by laying the front cover face down then align the small back piece along the bottom edge. Place a few stitch markers to hold it in place.
- Flip the cover over so the front cover is facing you.
- Insert your hook in the first stitch of the right-hand corner (going through both the front cover and small back piece) and pull up a loop, YO and pull through the loop; SC into the same stitch space [this is your first stitch]. Continue to SC along the bottom edge, putting 2 SC in the last stitch.
- Leave the yarn attached and move to the Attaching the Large Back Piece section below.
Attaching the Large Back Piece:
- Flip the cover back over so the front cover is facing down.
- Lay the large back piece over the front cover (making sure the buttonholes are at the bottom.
- Place either stitch markers or scrap pieces of yarn around the edge to keep the piece in place.
- Flip the cover back over so the front cover is facing up.
- SC into the same space as you last stitch. Going through the front cover, small back piece, and the large back piece. This is your third stitch for this corner.
- SC up the side. [Make sure for the part where the side of the small back piece is, that you are crocheting together only the front cover and large back piece. Not crocheting the small back piece at the sides will aide in attaching the buttons.]
- Place 3 SC in the first stitch of the top edge, then continue to SC across the top until you reach the last stitch, where you will place 3 SC.
- SC down the other side.
- Place the last stitch in the same space as the very first stitch. This will create the second stitches for that corner.
- Finish with an SSCF to the first stitch. This creates a faux third stitch for that corner. Finish by weaving in the ends.
Attaching the Buttons:
- Lay the cover facedown and smooth it out.
- Pull the large back piece down so that the bottom edge aligns with the bottom edge of the front cover/small back piece.
- Insert the non-hook end of your crochet hook into the center of the middle buttonhole.
- Without removing the hook, lift the large back piece. This will show you where you will place the first button.
- With your yarn needle, thread your needle from the back side to where your crochet hook is. Remove your hook and attach the button.
- Repeat Step 5 by attached the two outside buttons, then the inside buttons. Make sure to place all the buttons along the same horizontal line so the finished product is a straight line of cute buttons.
**Feel free to make and sell items that are made from this pattern. Please link back to the pattern on any online sales or include my web address on tags for any in-person sales. Please do not republish or distribute any of the pictures or patterns, in any form, from this site without permission from me. Please e-mail me for any inquiries.**











[…] Get Boho Vibes Crochet Pillow Cover Pattern […]
I tried it and it turned out great! Thanks for sharing your pattern.
[…] […]
Hello, is this yarn Acrylics or Cotton ? Or 100% wol, sorry I am from Holland and don’t know what worsted yarn is ? Gr Natascha
Worsted refers to the yarn weight. You can use any of the yarns mentioned as long as the weight is similar. Here is something that should help…https://www.craftyarncouncil.com/standards/yarn-weight-system
[…] […]
This is beautiful! I tried but just can’t handle all the color changes! How did you do it?
I have had LOTS of practice. Lol I also find that it’s easier to work at a table than it is sitting on the couch. I usually don’t work with whole skeins of yarn either, I’ll wrap a bunch around a piece of foam board. I cut a small slit in the foam board to hold the yarn as I turn it over so it doesn’t come unraveled. I hope that helps. ?
Why do you have Chain 71 (gold) in your example before row 1? Please see below what I’m referring to. Thank you!
I will walk you through a few rows to help get you started.
[Remember that I am working from the gold/magenta/teal chart.]
CH 71 [with Gold]
Row 1/1: [G] SC 6; [T] SC 4; [M] SC 4; [C] SC 6; [T] SC 6; [C] SC 6; [M] SC 6; [C] SC 6; [T] SC 6; [C] SC 6; [M] SC 4; [T] SC 4; [G] SC 6; CH 1; turn (70)
Hi Mandi,
Yes, CH 71 with gold. The highlighted part was missing and has now been added.
CH 71 [with Gold]
Row 1/1: [G] Starting in the 2nd CH from the hook, SC 6; [T] SC 4; [M] SC 4; [C] SC 6; [T] SC 6; [C] SC 6; [M] SC 6; [C] SC 6; [T] SC 6; [C] SC 6; [M] SC 4; [T] SC 4; [G] SC 6; CH 1; turn (70)
I hope that makes more sense.
Jennifer
Hi l would like to make the it larger how many stitch’s do I have to add.
Thank you
To make it bigger the design would have to be added on to. My best advice would be to use a larger hook size. How big are trying to make it?
I would like to make the pillow larger how can I do it. How many stitches do l add. Thank you
Hello,
how many yards os 1 Skein Each of Worsted Weight Yarn?
The skeins I used were aporox. 285 yards. You won’t use it all, but I like to make sure that I have more than enough to finish. There is nothing worse that running out mid project and not being able to find the same color. I hope that helps. ?
Hi
I just perched the boho vibes crochet pillow cover pattern from you to have as a pdf file, and I don’t have it? Is it emailed to me?
Many thanks
Emma Seychell
Yes, you should have received an email from Ravelry that included your pattern. If not, go to your Ravelry account and look under purchases. I hope this helps. If not, let me know and we’ll get it all sorted out. ?
You might also want to check your spam folder, just in case it ended up in there.