
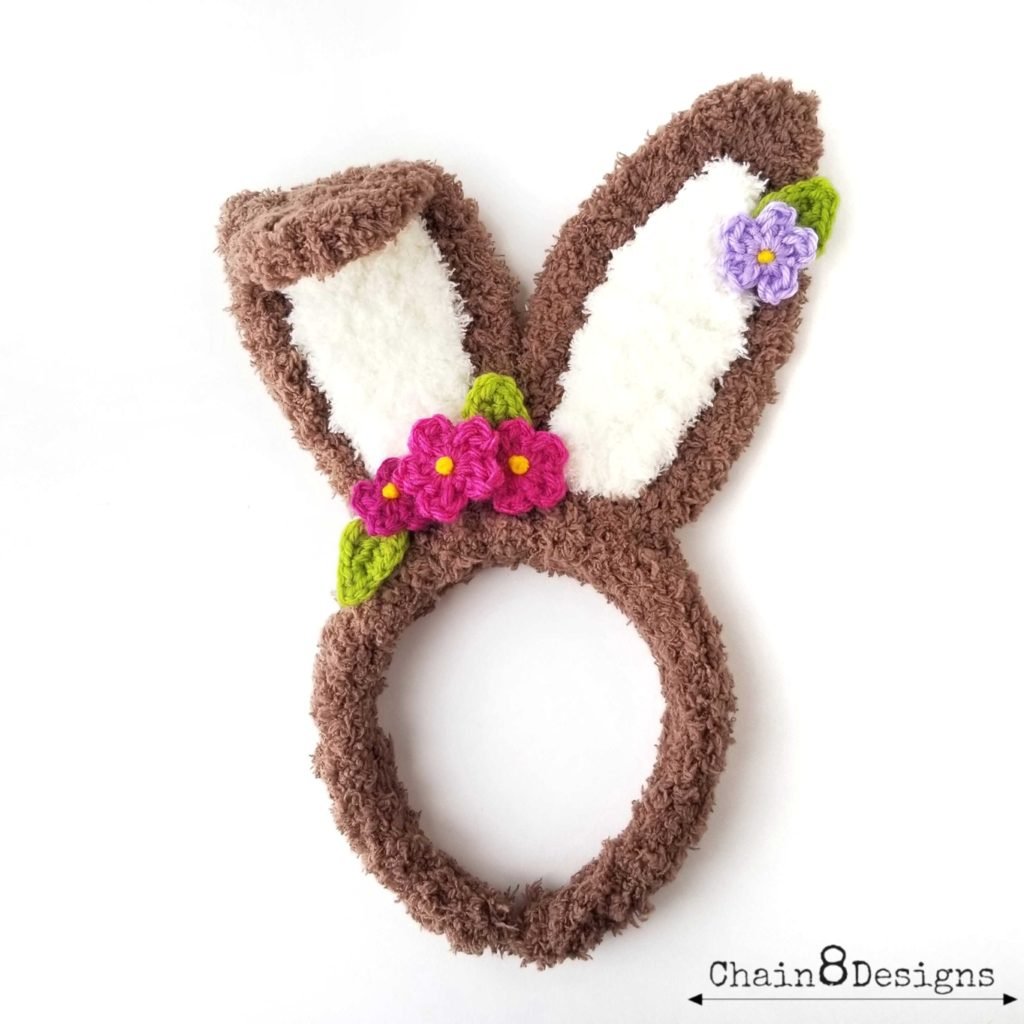
Easter is around the corner and as our daughter has gotten older, the more my husband has made Easter and especially the egg hunt bigger and better. When she was one it was just a simple basket. When she was two, we did her first egg hunt with a few eggs in the backyard. By the time she was four, my husband had taken it from a few eggs to 100! She has daddy wrapped around her little finger. LOL It is so fun to see her with her little basket, scouring the yard and getting so excited when she discovers an egg. It melts my mommy heart into a puddle.
Each year I have bought her a pair of bunny ears from the dollar store and frankly, they are cheaply made and not that cute. Not that I think I’m going to get couture for a $1 but I knew I could make something better.
I really wanted this headband to have a fuzzy feeling like a real bunny, so I used the Bernat Pipsqueak yarn. I’m not going to lie to you, it’s not the easiest yarn to work with. Because of the texture of the yarn, it is hard to see your stitches. Don’t let that scare you from using it though as the final effect is so worth it. I found that to work with it I had to let go of my usual perfectionism and just go with it. I might have single crocheted into the back loop only on a few stitches and maybe only the front loop on another. It’s too hard to tell but the nice part is that the texture hides any sins. You will use your sense of feel more than sight to get the stitch placement right.
You can leave the ears plain or add the flowers as I have. It would look cute if you matched the flower color to your child’s Easter dress. You can customize the flowers however you like. Maybe put flowers on only one ear or add beads or pearls to the flower middles. The sky is the limit on how you can embellish these fuzzy little ears.
If you have a few headbands you want to make for the kiddos in your life, I found that you can get at least two headbands from one skein of the outer color. And because the flowers use so little yarn, they are great for using any leftover bits you have from other projects. I’m always looking for ways to use small amounts of yarn I have leftover and these little flowers are perfect.

DISCLAIMER: This post may contain affiliate links. I receive a small percentage from any purchases you may make (at no cost to you.)
HIPPITY HOPPITY HEADBAND
PURCHASE AN AD-FREE PRINTABLE/DOWNLOADABLE PFD ON RAVELRY.
MATERIALS NEEDED:
- Size I Hook (for headband and ears)
- Size D, F, H, & K Hooks (for flowers and leaves) [optional]
- 1 Skein Bernat Pipsqueak Yarn in Whitey White or Chocolate
- 1 Skein Bernat Pipsqueak Yarn in Tickle Me Pink or Vanilla
- 4-6 yds. of Four Different Colors of Worsted Weight Yarn (for flowers) [optional]
- 8-10 yds. of Green Worsted Weight Yarn (for leaves) [optional]
- 9 Small Beads, Pearls, Gems, or 6 yds. of Yellow Worsted Weight Yarn (for flower centers) [optional]
- 1″ Plastic Headband
- 8 Chenille Stems in a Color Close to the Outer Ear Color
- Scissors
- Yarn Needle
- Hot Glue Gun and Glue
- 1″ x 1″ Square of Felt in a Color Close to the Outer Ear Color
ABBREVIATIONS:
- CH = Chain
- DC = Double Crochet
- HDC = Half Double Crochet
- SC = Single Crochet
- SC2tog = Single Crochet Two Together
- SL st = Slip Stitch
- SSCF = Seamless Single Crochet Finish

HEADBAND COVER
- Use I hook
- CH does NOT count as a stitch.
CH 4 (leaving at least a 12″ tail)
Row 1: SC in 2nd CH from hook; SC next 2; CH 1; turn (3)
Row 2-3: SC all; CH 1; turn (3)
Row 4: SC; 2 SC; SC; CH 1; turn (4)
Row 5-6: SC all; CH 1; turn (4)
Row 7: SC; 2 SC; SC next 2; CH 1; turn (5)
Row 8-10: SC all; CH 1; turn (5)
Row 11: SC next 2; 2 SC; SC next 2; CH 1; turn (6)
Row 12-14: SC all; CH 1; turn (6)
Row 15: SC next 3; 2 SC; SC next 2; CH 1; turn (7)
Row 16-27: SC all; CH 1; turn (7)
Row 28: SC next 3; SC2tog; SC next 2; CH 1; turn (6)
Row 29-30: SC all; CH 1; turn (6)
Row 31: SC next 2; SC2tog; SC next 2; CH 1; turn (5)
Row 32-34: SC all; CH 1; turn (5)
Row 35: SC; SC2tog; SC next 2; CH 1; turn (4)
Row 36-38: SC all; CH 1; turn (4)
Row 39: SC; SC2tog; SC; CH 1; turn (3)
Row 40: SC all; CH 1; turn (3)
Row 41: SC all; fasten off leaving a 36″ tail (3)
OUTER EARS
- Use I hook
- Make 2
- Chain does NOT count as a stitch.
CH 6
Row 1: SC in 2nd CH from hook; SC next 4; CH 1; turn (5)
Row 2: SC all; CH 1; turn (5)
Row 3: SC next 2; 2 SC; SC next 2; CH 1; turn (6)
Row 4: SC all; CH 1; turn (6)
Row 5: SC next 3; 2 SC; SC next 2; CH 1; turn (7)
Row 6: SC all; CH 1; turn (7)
Row 7: SC next 3; 2 SC; SC next 3; CH 1; turn (8)
Row 8-11: SC all; CH 1; turn (8)
Row 12: SC next 3; SC2tog; SC next 3; CH 1; turn (7)
Row 13: SC next 3; SC2tog; SC next 2; CH 1; turn (6)
Row 14: SC next 2; SC2tog; SC next 2; CH 1; turn (5)
Row 15: SC next 2; SC2tog; SC; CH 1; turn (4)
Row 16: SC; SC2tog; SC; CH 1; turn (3)
Row 17: SC2tog; SC; CH 1; turn (2)
Row 18: SC2tog; fasten off (1)
INNER EARS
- Use I hook
- Make 2
- Chain does NOT count as a stitch.
CH 4
Row 1: SC in 2nd CH from hook; SC next 2; CH 1; turn (3)
Row 2: SC all; CH 1; turn (3)
Row 3: SC; 2 SC; SC; CH 1; turn (4)
Row 4: SC all; CH 1; turn (4)
Row 5: SC; 2 SC; SC next 2; CH 1; turn (5)
Row 6: SC all; CH 1; turn (5)
Row 7: SC next 2; 2 SC; SC next 2; CH 1; turn (6)
Row 8: SC all; CH 1; turn (6)
Row 9: SC next 3; 2 SC; SC next 2; CH 1; turn (7)
Row 10-11: SC all; CH 1; turn (7)
Row 12: SC next 3; SC2tog; SC next 2; CH 1; turn (6)
Row 13: SC next 2; SC2tog; SC 2; CH 1; turn (5)
Row 14: SC; SC2tog; SC 2; CH 1; turn (4)
Row 15: SC; SC2tog; SC; CH 1; turn (3)
Row 16: SC2tog; SC; CH 1; turn (2)
Row 17: SC2tog; fasten off; weave in ends (1)
FLOWERS
For the flowers, we will be using my Easy Five-Petaled Crochet Flower pattern.
You can make your flowers in any color combination, size, or number that you want. I used a triple French knot for the center of my flowers, but they would also look cute with beads, pearls, or gems in the middle. If you don’t know how to make a French knot, there are some wonderful tutorials online.
Regarding the white headband, I made nine flowers in various sizes and colors. Below are the specifics…
- Color A = One with K hook and two with F hook [Premier Everyday in Peony]
- Color B = Two with H hook [Red Heart Super Saver in Medium Purple]
- Color C = Two with H hook [Caron Simply Soft in Fuchsia]
- Color D = Two with D hook [Premier Everyday Baby in Purple]

LEAVES
- Use F hook
- Make 4
CH 4
SC in 2nd CH from hook; HDC in next; 6 DC in last CH; [working down the other side of the CH] HDC in next; 2 SC in last; SSCF to first SC; weave in ends.


ASSEMBLY
I found that because of the large holes of the designs, the headband ends were poking through. To combat

To assemble the headband cover, fold one of the short ends of the cover in half and whipstitch the edge to close, repeat on the other end. Flip the seams to the inside. This will create a little pocket that the ends of your headband sit in. Place the headband ends in the little pockets then whipstitch the cover together (with the long yarn tail), enclosing the headband, and weave in the ends.


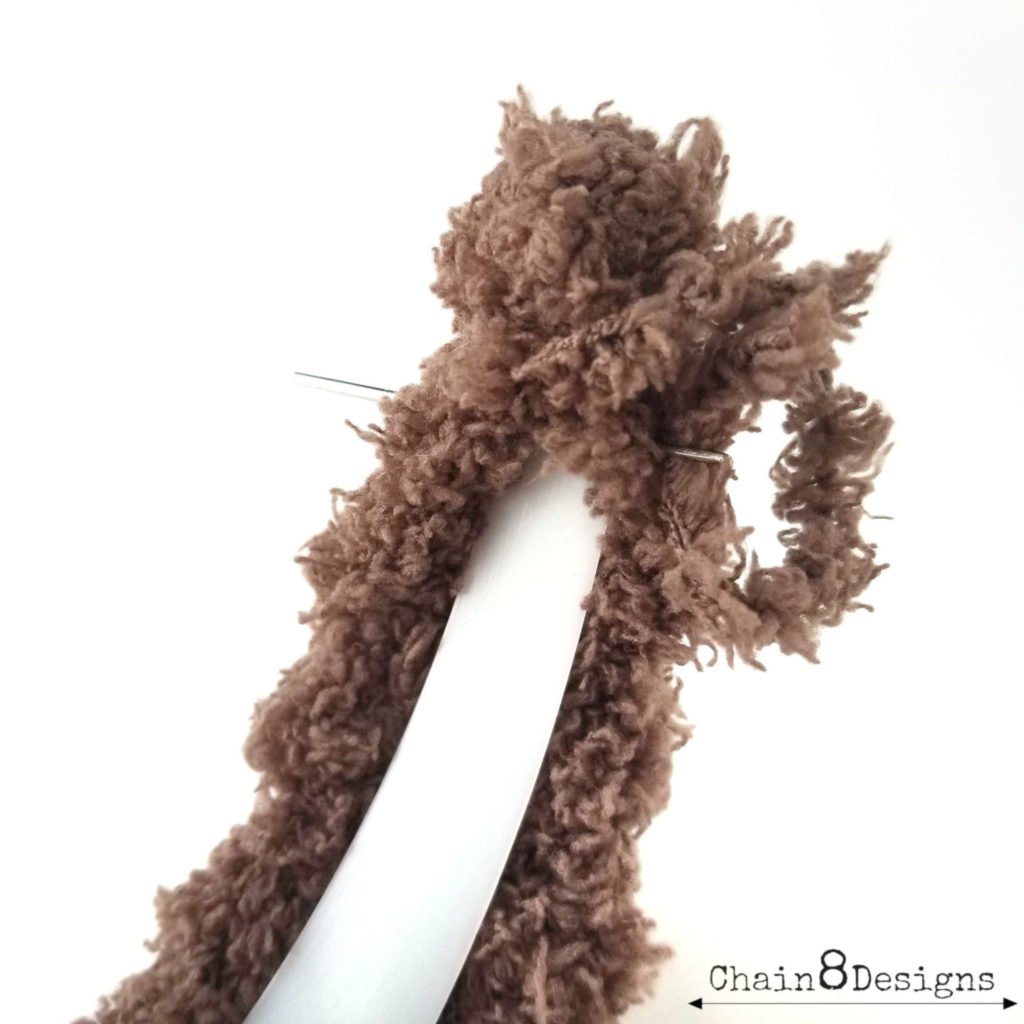

We will be single crocheting around the edge of the outer ears and enclosing the chenille stems within to give the ears rigidity and bendability. Because one chenille stem is not long enough to go around the whole of the ear, we will be gluing two together. Place a small amount of hot glue on the end of one chenille stem and glue it to the end of another. You don’t need the overlap to be much, a 1/4″ will do. Run your hand over the join and make sure that the wire isn’t poking out. If so, put a small dollop of glue at the wire end to cover it. Even though we are crocheting over the stem we don’t want there to be any wire that could possibly poke a child’s hand. If you find that you have used a little too much glue, trim down any excess. Repeat this until you have four long chenille stems.
I found that the thickness of one long chenille stem was not enough so we will be twisting two long stems together. Start with one stem about a half inch above the other (so the glued middles are not in the same spot) and twist the two chenille stems together. It helps to tape the stems to a table while you are twisting them together.


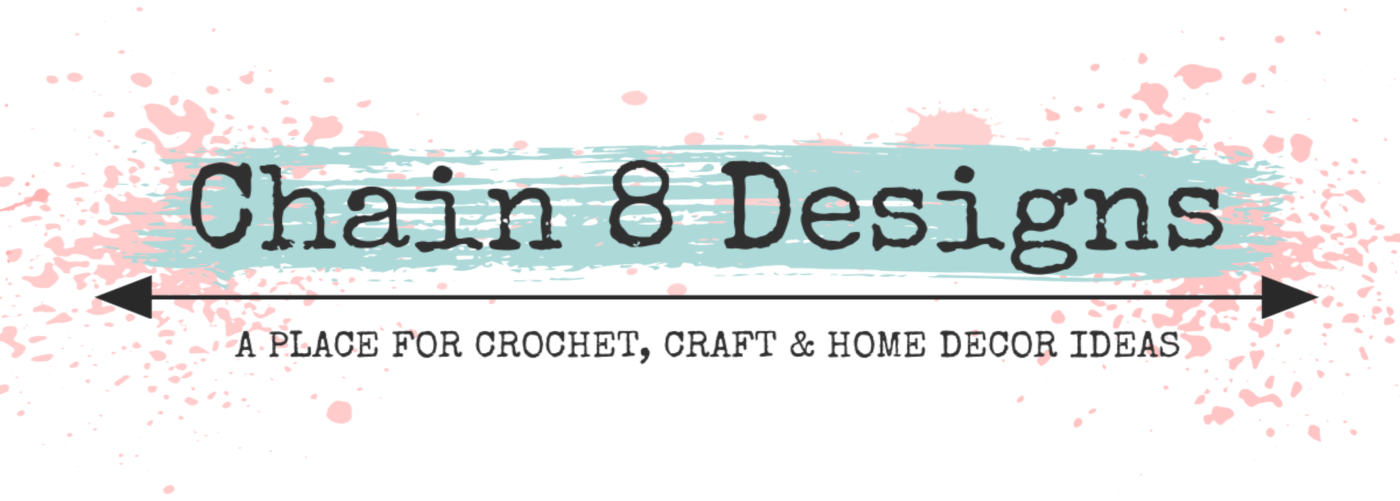
Take an outer ear and on the bottom right-hand corner, insert your hook and pull up a loop, before yarning over and pulling through the loop set your chenille stem along the edge then complete the single crochet. Continue single crocheting around the edge, enclosing the chenille stem, but stop when you reach the bottom of the other side of the ear. There is no need to single crochet the bottom edge of the ear. Fasten off, leaving at least a 24″ tail to attach the ear to the headband with. I don’t have the exact number of single crochets that I used, as it is very hard to see your stitches with this yarn but do enough that you do not see the chenille stem.

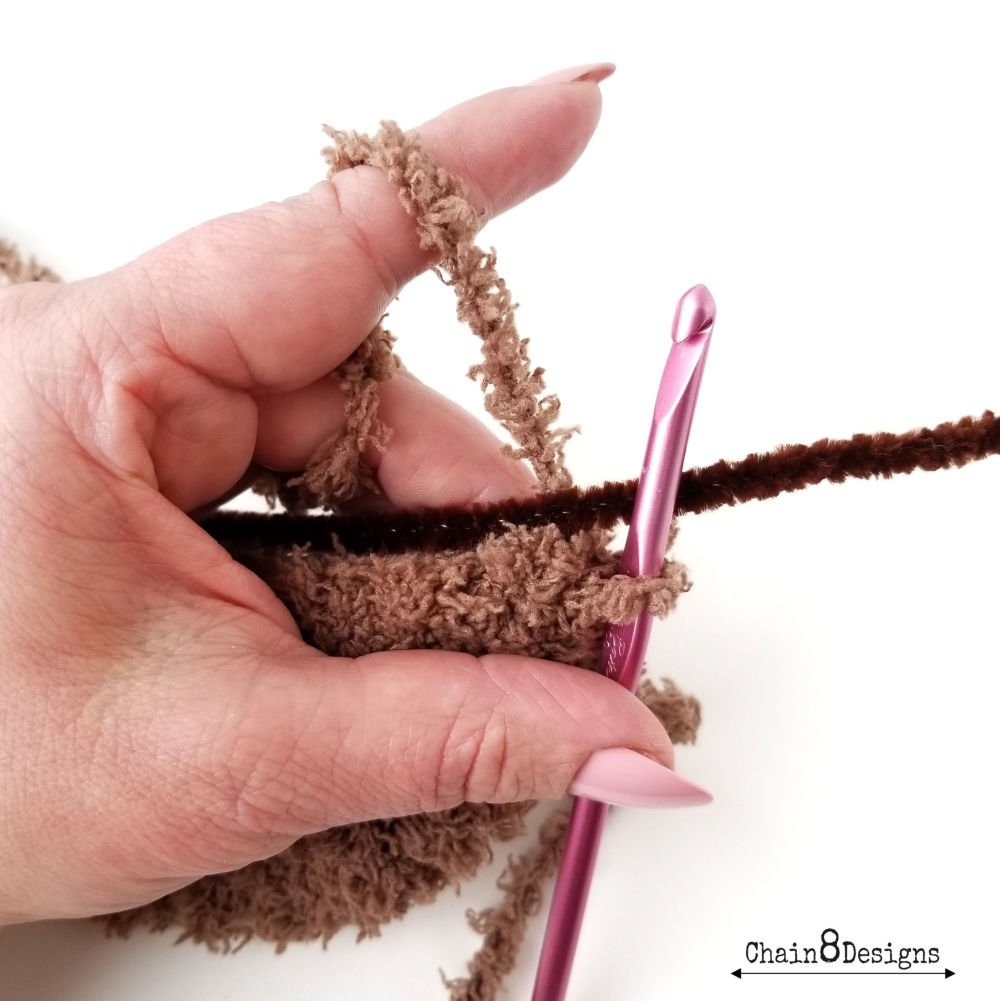

Cut the chenille stem flush with the bottom of the ear. Push up the ear so you expose the ends of the chenille stems and place a small dollop of glue on the wire ends. Wait for it to harden and push the ear back down.

Now, take the inner ear and line up the bottom with the bottom of the outer ear and use the tail we left attached to sew it down. To keep the inner ear in place as you sew, place a small amount of hot glue in a couple of places. As you sew, be careful to only grab the top layer of the outer ear so that you don’t see any of the inner ear color on the back of the ear. Repeat with the second ear.
Fold the bottom of the ear in half, bringing the two sides together. Take the tail and stitch the two bottom ear corners together, leave the tail attached. Now repeat this on the other ear. This will create a wider base with which to attach the ears to the headband.
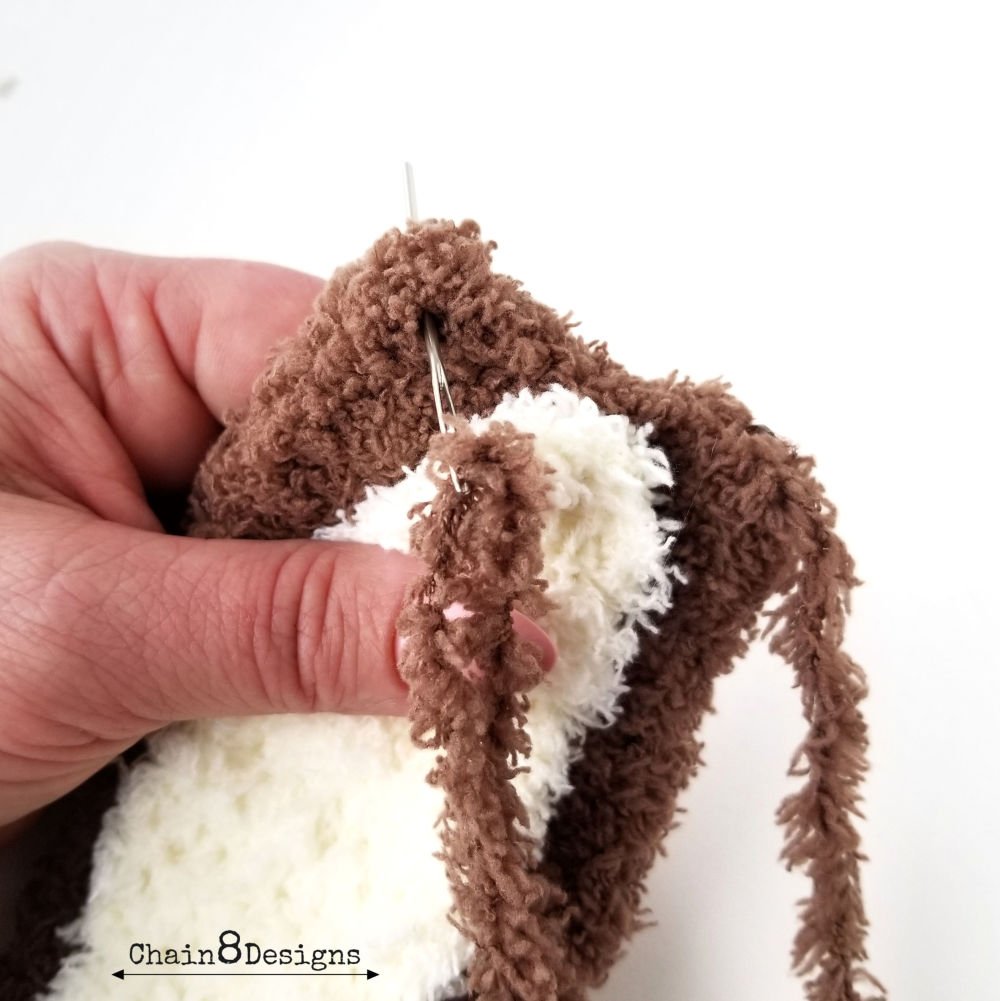

Find the middle point of the headband and place either a stitch marker or a small piece of yarn to mark it. Place a small amount of glue on the bottom of one ear and place to one side of the midpoint. The glue is to hold the placement of the ear while you sew it to the headband. Now sew the ear to the headband. Repeat the process with the other ear.

At this point, you can leave the ears as is or like I have you can add the flowers and leaves. I took the flowers and leaves and played around with the placement until I found an arrangement that I liked. Once I was happy with the way it looked, I hot glued the flowers and leaves down. You can try to sew them down, but you will find it to be very difficult. Hot glue works perfectly fine.


Now that your headband is complete you are ready to

**Feel free to make and sell items that are made from this pattern. Please link back to the pattern on any online sales or include my web address on tags for any in-person sales. Please do not republish or distribute any of the pictures or patterns, in any form, from this site without permission from me. Please e-mail me for any inquiries.**
Add a Comment