[5/14/18…Pattern and PDF has been updated to fix missing stitch language in hat band.]

“Nearly everybody gets twitterpated in the springtime. For example: you’re walking along, minding your own business. You’re looking neither to the left, nor to the right, when all of a sudden, you run smack into a pretty face. Woo-woo! You begin to get weak in the knees. Your head’s in a whirl. And then you feel light as a feather; and before you know it, you’re walking on air.” – Friend Owl, Bambi
I love the look of knitting and the quickness of crochet so I was very pleased when, browsing Pinterest, I stumbled upon the knit stitch (aka waistcoat stitch) in crochet. If you’ve never tried it before it’s a very simple stitch, single crochets are just worked in a different spot then normal. It doesn’t get much easier than that!
In honor of all those feeling twitterpated on this Valentine’s Day, I’ve created a pattern full of the international symbol of love…hearts. You can work the hearts in a single color, or like I have, in an ombre color scheme. This pattern is for an adult-sized beanie that is approx. 22 inches (my head is approx. 23 inches and it fits perfectly.) There is a little stretch to the stitch but not much so if you need a little smaller/larger size then decrease/increase both hook sizes by one or two.
DISCLAIMER: This post may contain affiliate links. I receive a small percentage from any purchases you may make (at no cost to you)
TWITTERPATED HEART BEANIE
Materials Needed:
Size H Hook
Size I Hook
2 Skeins grey yarn (I used Deborah Norville Everyday in Steel)
1 Skein of each color desired for the hearts (I used Deborah Norville Everyday in Aubergine [Dark Purple], Bright Violet [Magenta], Peony [Light Purple], and Baby Pink [Light Pink])
Yarn Needle
Faux Fur Pompom
Abbreviations:
SC = Single Crochet
SL = Slip Stitch
CH = Chain
SCtog = Single Crochet Two Together (insert hook into stitch, yarn over and pull through a loop, insert hook into next stitch, yarn over and pull through a loop, yarn over and pull through all three loops on hook)
BAND
(With H Hook)
Chain 8
Row 1: SC in 2nd CH from hook; SC the rest; CH 1; turn (7)
Row 2-70: SC in back loop of all; CH 1; turn (7)
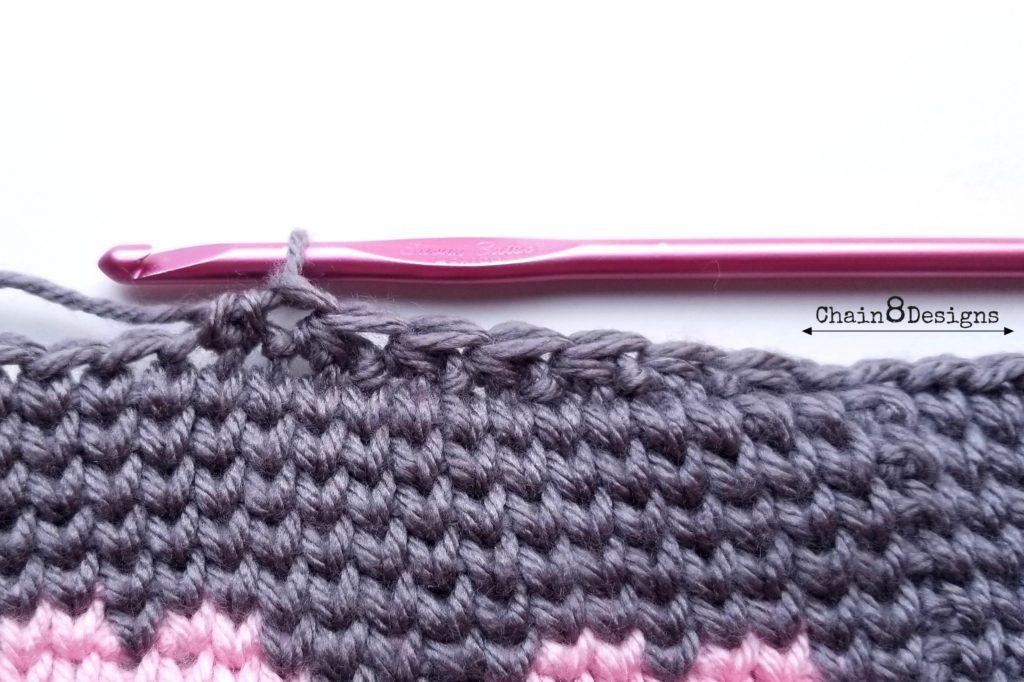
Bring the two ends together and SC across to form a circle.

SC 70 stitches evenly around the edge of the brim; SL to first SC; CH 1 (70)

GRAPH
From here on out we will be working from the graph. Each box on the graph equals one stitch. We will start in the bottom right corner at box 1/1.

Get the PDF version of the chart here: Twitterpated Pattern Chart
It’s important that for the graph portion you work loosely. Your hook should easily slide into the stitch. I have a tendency to work on the tighter side, if you are like me, it might take you a couple tries of the first two rounds to get your tension right.
Your slip stitches will be worked into the top of the first single crochet of the round. Pull both your slip stitch and chain one tightly. This will help hide these stitches.
Instead of doing a traditional single crochet we will be single crocheting into the “V” created by the previous row. Your hook should slide easily into the stitch, if it doesn’t, you need to loosen your tension.

I will walk you through a few rounds to get you started….
(Switch to I Hook)
Round 1: [With grey] SC in all; SL; CH 1 (70)
Round 2: *[With grey] SC 9; [switch to dark purple] SC 1*; repeat from * 6 times; SL; [switch to dark purple] CH 1 (70)

Round 3: [With dark purple] SC; *[switch to grey] SC 7; [switch to dark purple] SC 3*; repeat from * 5 times; [switch to grey] SC 7; [switch to purple] SC 2; SL; CH 1 (70)
Because weaving in ends is probably my least favorite part of crochet, I carry my yarn. I make sure that the yarn being carried behind gets crocheted over by the new color and isn’t too tightly pulled. As you can see it creates a rather tidy looking inside. It is a personal preference though, so it’s up to you whether to carry your yarn or not.
Continue to follow the graph until you finish Round 28.
To close the top we will be doing traditional SCtog stitches (not through the “V” stitches like before.)
Round 29: SCtog all; SL; CH 1 (35)
Round 30: SCtog 17 times; SC; SL; fasten off leaving at least a 24″ tail (18)
With your yarn needle and thread, weave in and out of the stitches all the way around and then pull tight to close. Weave in your ends and attach pompom.

I hope that you are as twitterpated as I am with this pattern. If you make a hat of your own I would love to see pictures of your creations. I hope that everyone has a love filled Valentine’s Day!!!!
Want an easy printout of this pattern? Here is a PDF version for you Twitterpated Hat Pattern (updated)

**Feel free to make and sell items that are made from this patterns. Please link back to the pattern on any online sales or include my web address on tags for any in-person sales. Please do not republish or distribute any of the pictures or pattern, in any form, from this site.**
WANT TO SEE SNEAK PEEKS OF UPCOMING PATTERNS AND PROJECTS OR GENERAL HOME DECO./CROCHET/CRAFTING FUN?
Follow me on Instagram: chain8designs
Follow me on Facebook: Chain8Designs


Hi!
I’m super excited to make this for use in February! I’ve gotten pretty quick at hats of all kinds, including “ribbed” bands…BUT, my band looks nothing like yours! I looked up the yarn you used and it seems fairly standard. Is that brand a fluffier, plumper strand? I’m using just Red Heart Supersaver and mine is turning out VERY flat, not three dimensional like yours. SC is US single crochet, correct? Any thoughts would be great!
Are you single crocheting in the back loop only?
Is this an adult or child pattern?
It is an adult sized pattern. ?
Taken from the “Directions” section of the pattern: … “This pattern is for an adult-sized beanie that is approx. 22 inches (my head is approx. 23 inches and it fits perfectly. There is a little stretch to the stitch but not much so if you need a little smaller/larger size then decrease/increase both hook sizes by one or two.) “
It is an adult pattern.
[…] Twitterpated Heart Beanie […]