Because we are all practicing social distancing and need things to keep ourselves entertained (one can only watch so much Tiger King LOL) I have created an easy downloadable/printable PDF of this pattern. I hope that it brings some joy to what is a very challenging time for many of us.
If you make one, I would love to see it!!! Tag me on Instagram @chain8designs so I can see.
I hope that everyone is safe and healthy and that this ends sooner rather than later. Till next time…HAPPY HOOKING.
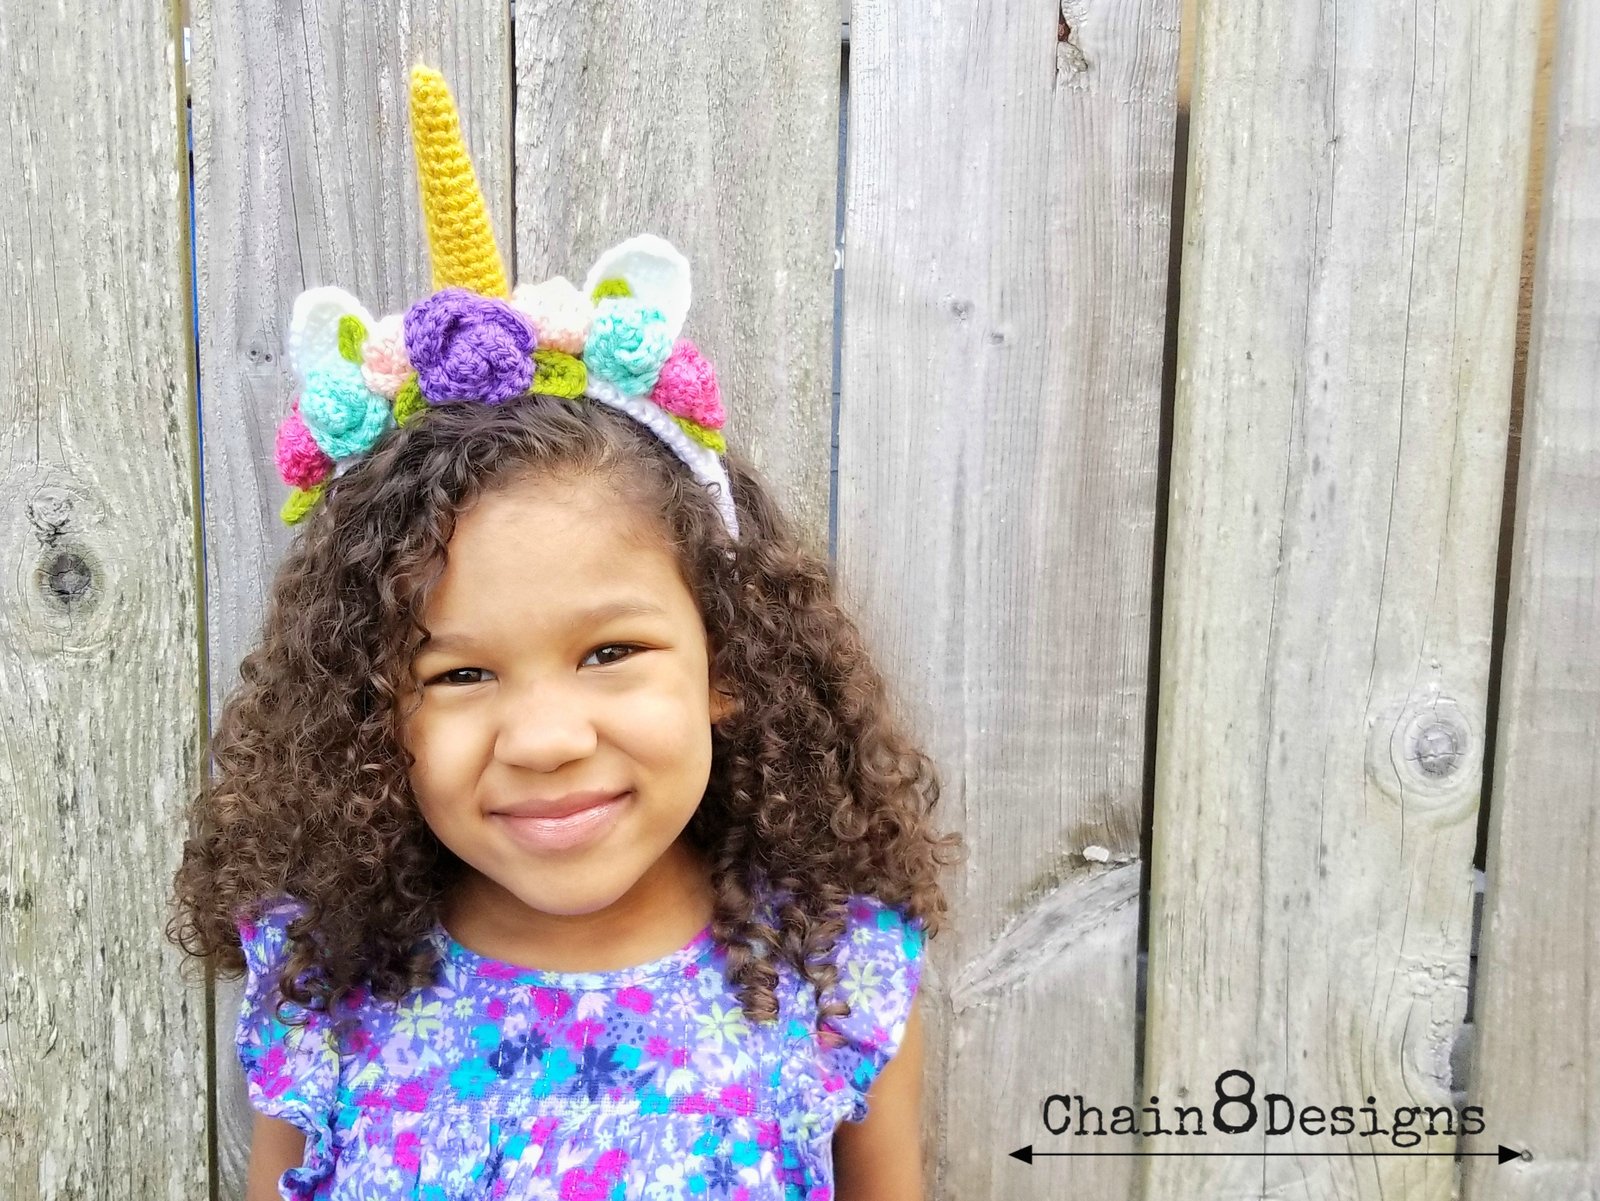
My daughter is at the age where make-believe and dress up are a big thing. Some days she’s a cat, the next she’s a frog, then she’s a pretty pretty princess. I never know what I’m going to get each morning. She has quite a costume and prop collection to go with her ever-changing personas but we were missing every little girl’s favorite, the unicorn. My daughter is under the impression that mommy can make anything so she asked me to make her into a unicorn and I couldn’t say no to her cute little face. If you (unicorns aren’t just for kids LOL) or your babies love unicorns as much as my daughter than this easy to make headband is the perfect way to make yourself into a magical unicorn.
Want to see sneak peeks of upcoming projects? Follow me on Instagram.
THE MAGICAL UNICORN HEADBAND
[8/15/19 UPDATE…There was a problem with the flower pattern. I have removed Row 2 and changed Row 1. This will create a flatter flower that will sit better on the headband.]
CH 5 Row 1: SC in 2nd CH from hook; SC next 3; CH 1; turn (4) Row 2: 2 SC; SC next 2; 2 SC; CH 1; turn (6) Row 3-8: SC all; CH 1; turn (6) Row 9: SC2tog; SC next 2; SC2tog; CH 1; turn (4) Row 10: SC2tog; SC2tog; CH 1; turn (2) Row 11: SC2tog; CH 1 (1) Finishing: SC around the edge of the whole ear (making sure to put 2 SC in each bottom corners); finish with SSCF to first SC .
HORN
The horn is worked in-the-round. Make sure to place your stitch marker on the first stitch of each round so you don’t lose your place.
Magic Ring: 6 SC into magic ring Round 1: SC all (6) Round 2: 2 SC; SC 5 (7) Round 3: SC all (7) Round 4: 2 SC; SC next 6 (8) Round 5: SC all (8) Round 6: 2 SC; SC next 7 (9) Round 7: SC all (9) Round 8: 2 SC; SC next 8 (10) Round 9: SC all (10) Round 10: 2 SC; SC next 9 (11) Round 11: SC all (11) Round 12: 2 SC; SC next 10 (12) Round 13: SC all (12) Round 14: 2 SC; SC next 11 (13) Round 15: SC all (13) Round 16: 2 SC; SC next (14) Found 17: SC all (14) Round 18: 2 SC; SC next 13 (15) Round 19: SC all (15) Round 20: 2 SC; SC next 15 (16) Round 21: SC all (16) Fasten off leaving 18″ tail for attaching to headband cover.
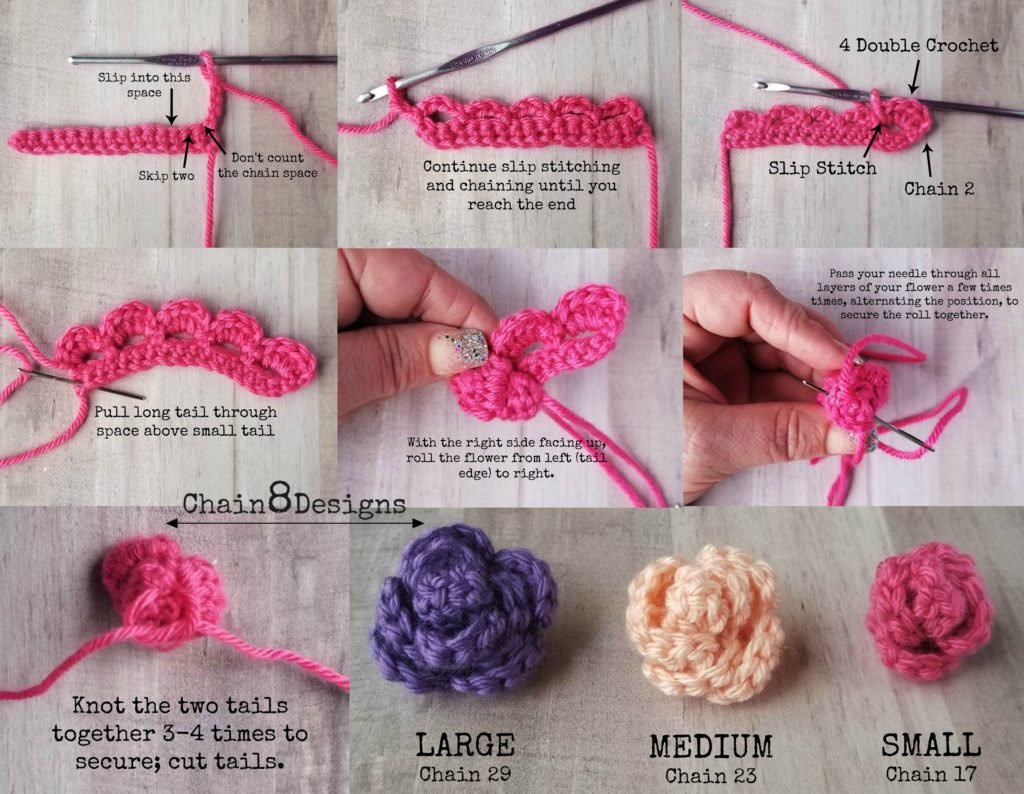
FLOWERS
Make 1 large, 4 medium, and 2 small
CH 17 (23, 29) Row 1: SC in 2nd CH from hook; SC 15 (21, 27); CH 1; turn (16, 22, 28) Row 2: Skip 2 [chain space does NOT count as a stitch]; SL; *CH 4; SK 2; SL*; repeat till end; CH 2; turn Row 3: [in loop created in the previous row] 4 DC; SL; *SL into next loop then CH 2; 4 DC; SL*; repeat from * into each loop Fasten off leaving 18″ tail
Thread long tail onto the needle and insert into space right above the short starting tail. With the right side facing up, roll the flower up from left to right. Now insert the needle through all the layers at the bottom to secure them together. Do this a few times, alternating the placement. Once you are sure that you have all your layers secured together, tie the two tails in a knot 3-4 times and cut.
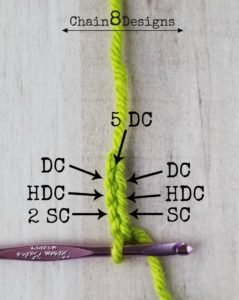
LEAF
Make 6
CH 5 SC into 2nd CH from hook; HDC; DC; 5 DC; (working down the other side of CH) DC; HDC; SC; finish off with SSCF
ASSEMBLY
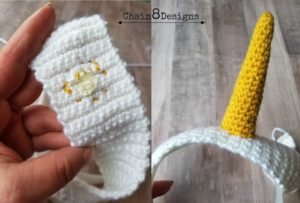
1. Stuff the horn with the fiberfill until the horn will hold its shape and will stand nicely on the headband without being floppy.
2. Find the middle point of your headband cover and position the horn. You can use a few scrap pieces of yarn to tack the horn down till you get done sewing around the edge.
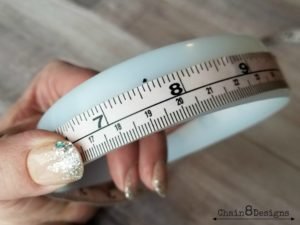
3. Take your fabric tape measure and measure the headband from tip to tip across the top. Take your sharpie and mark where the middle point of your headband is (mine is 7 5/8″)
4. To keep the horn from moving off-center we will be gluing the horn portion to the headband. Put a small amount of hot glue on the area under the horn and attach the headband cover (with attached horn) on the area where you placed the sharpie mark. Making sure that it is centered.
5. Now we will wrap the headband with the cover. With the long tail threaded on your needle, insert the needle into the corner of the edge opposite the tail and pull through. Do the same with the next two stitches of the short side and then through the last stitch and bring the needle back to where your tail originally started. Slip the end of the headband into the little pocket you just created and start to whipstitch the two long sides together, enclosing the headband. Do this until you have enclosed the whole of the headband, fasten off, and weave in end.
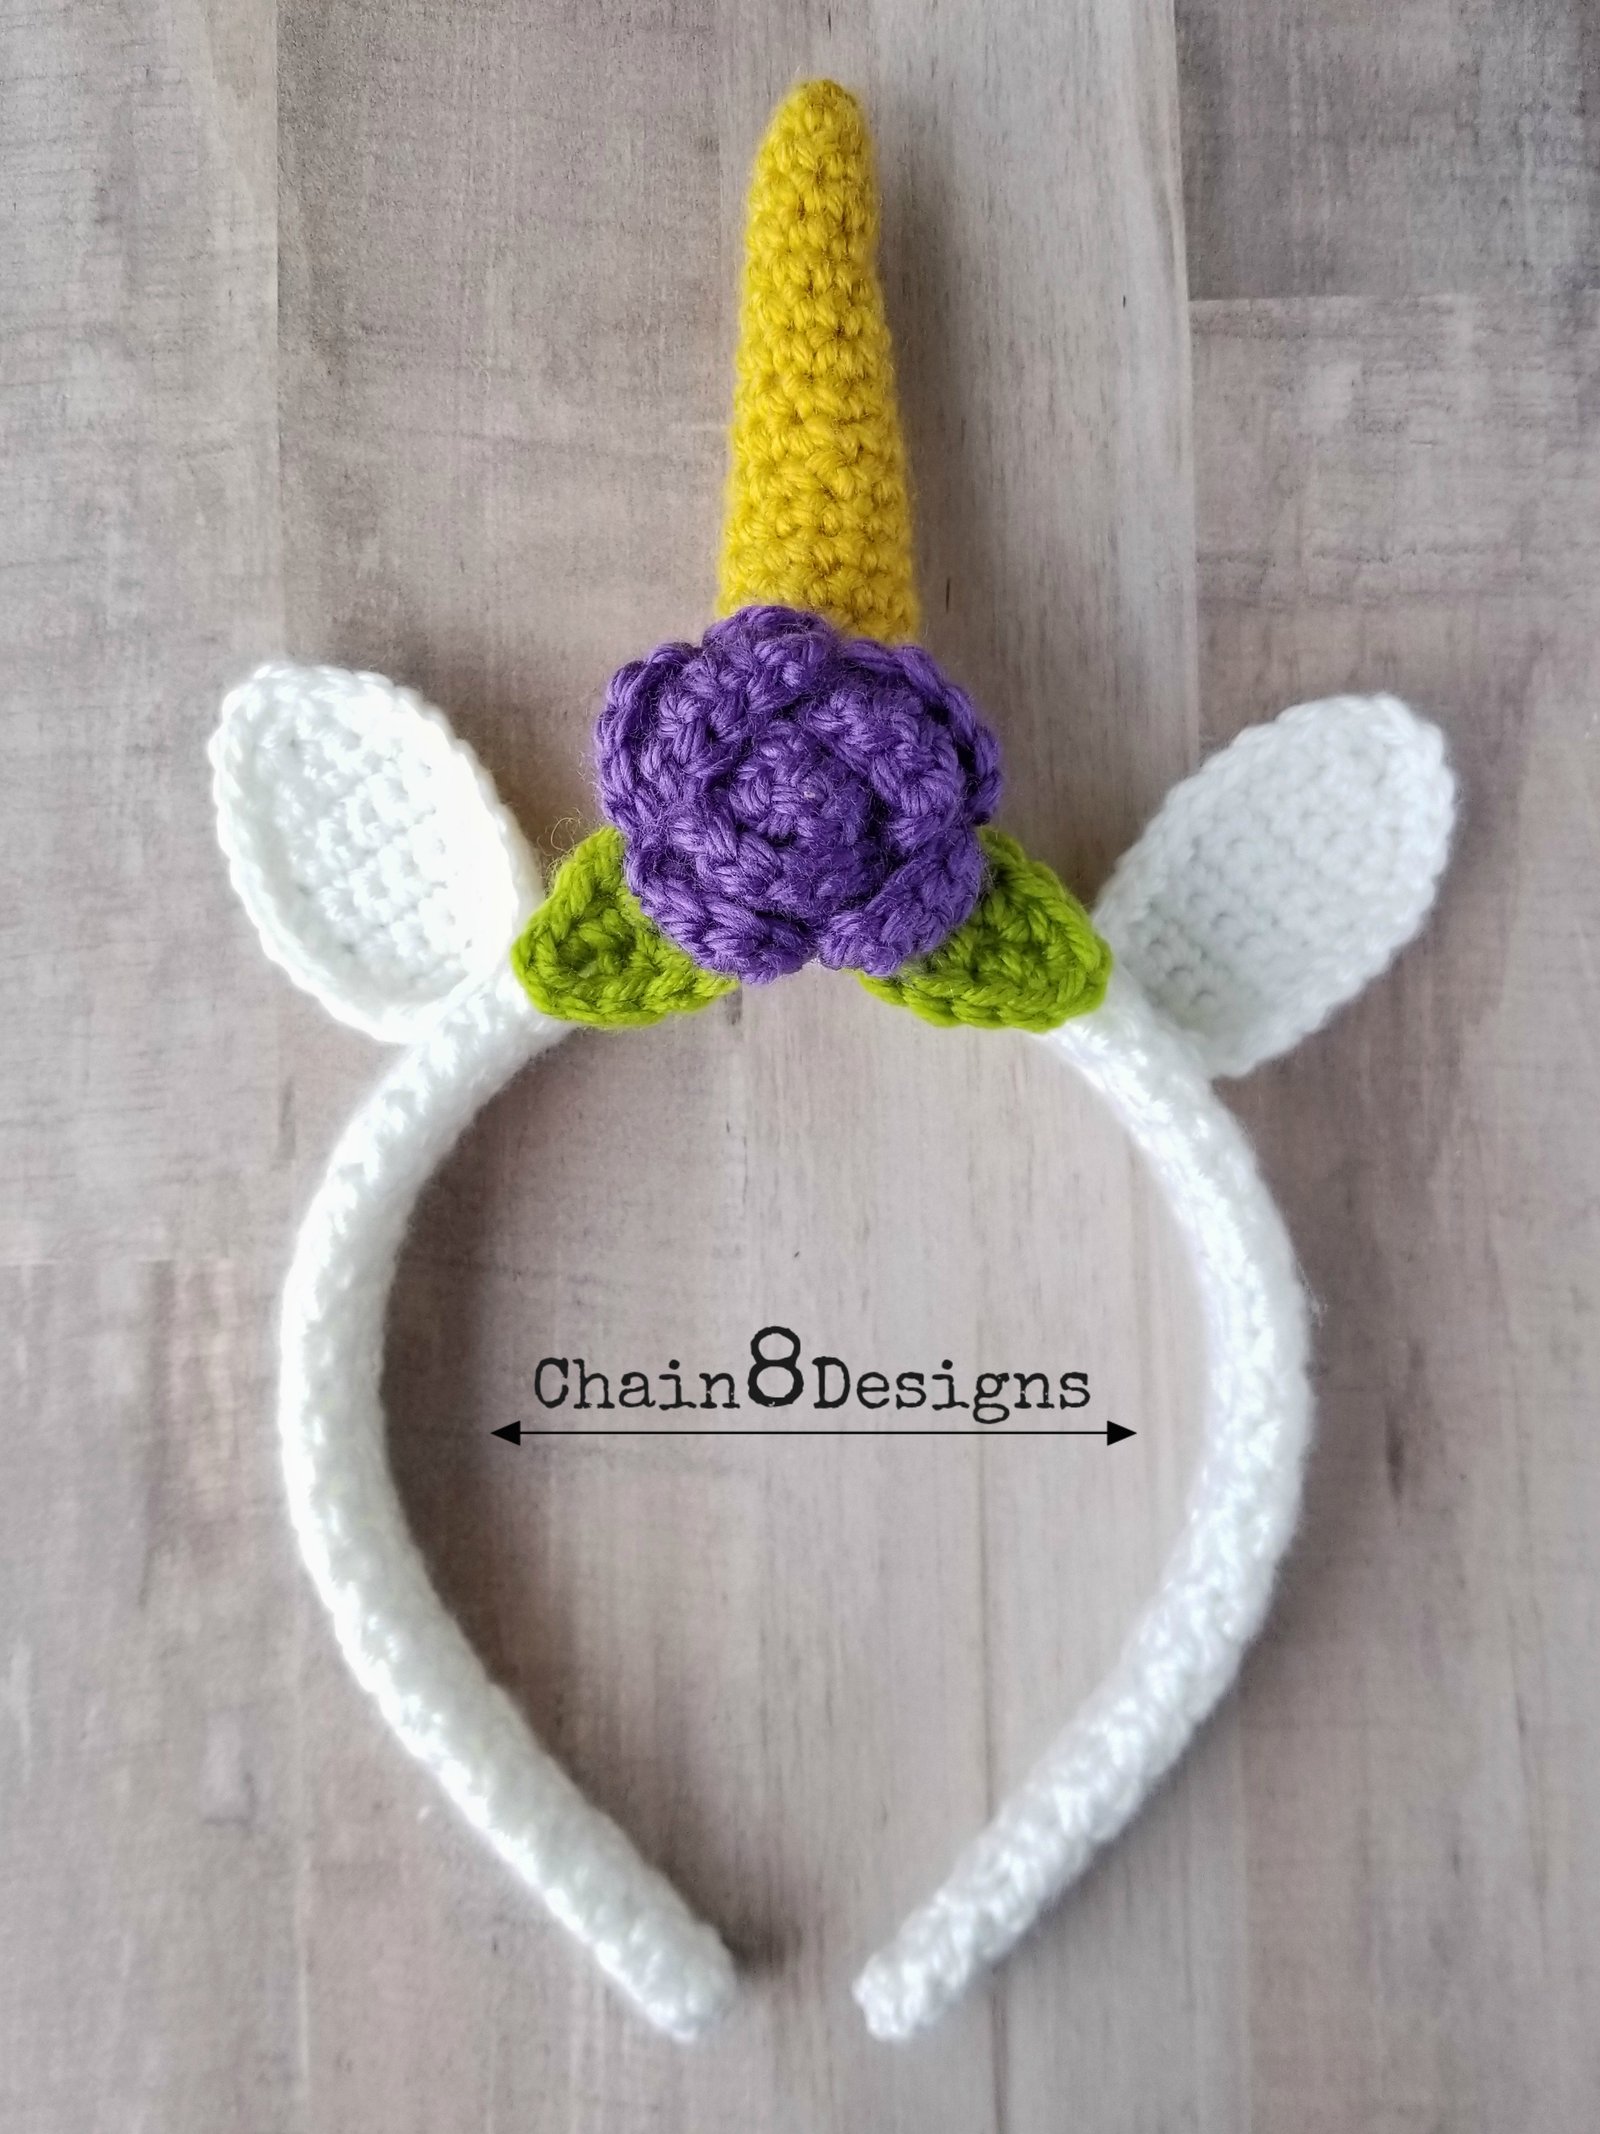
6. Hot glue two leaves to the front edge of the headband in front of the horn.
7. Hot glue large flower into space in front of the horn and over the two leaves from Step 6.
8. Hot glue ears 1 1/4″ to each side of the horn, butting them up to the back edge of the headband.
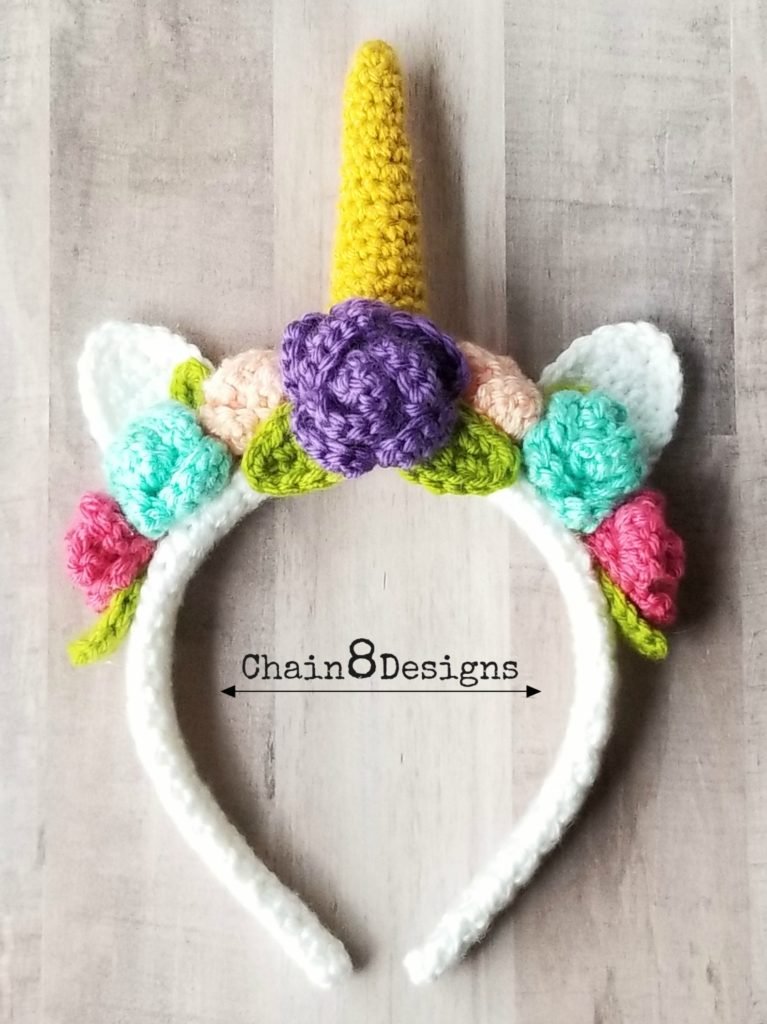
9. Continue to hot glue and leaves. Place medium flowers on each side of the horn; the next set of medium flowers in front of the ears; and the small set of flowers on the end. Tuck in and glue the leaves where you’d like.
You now have a cute headband to turn yourself or your child into a magical unicorn. If you make a headband of your own I would love to see your creations. Post them in the comment section or on Instagram #chain8designs.
**Feel free to make and sell items that are made from this pattern. Please link back to the pattern on any online sales or include my web address on tags for any in-person sales. Do not republish or distribute any of the pictures or pattern, in any form, from this site.**
WANT TO SEE SNEAK PEEKS OF UPCOMING PATTERNS AND PROJECTS OR GENERAL HOME DECOR DIY/CROCHET/CRAFTING FUN? Follow me on Instagram: chain8designs Follow me on Facebook: Chain8Designs
Hi Karen. Without seeing what your cover looks like I can’t really answer that. If possible, can you DM me a picture of the cover at Chain 8 Designs FB?
Felicia Pitasi
Hi Jennifer! I have always been a lover of unicorns, and was delighted when I found your pattern!! However, I am unable to get the pattern to print? Is there a trick to this, or is there another way I can get the pattern from you? I have 2 little girls to make them for, and can’t wait to get started! With all of the time at home now, due to the Corona Virus, I was hoping to get them made. Thanks so much for your time, and your generosity in sharing with others! Sincerely in crafting, Felicia
Hi Felicia! I promise I haven’t forgotten about you. I am working on an easily downloadable/printable PDF right now. It will be up this evening. ? -Jennifer
Hi Felicia…the PDF is now up! I hope you and your girls love it. I would love to see when you’re done. Tag me on Instagram @chain8designs. Have a great weekend! Jennifer
Heather
Hi, I love your designs and right now am trying the unicorn headband as I have a granddaughter who loves all things unicorn. I am however having trouble with the ear portion of pattern specifically row two…2sc 2c?? Can you help.?
adminAuthor
I’m sorry about that. It has been fixed. It is 2 SC, SC next 2, 2 SC… I hope that helps. ?


Why is the headband cover so long? I can’t figure out how to assemble this per your instructions.
Hi Karen. Without seeing what your cover looks like I can’t really answer that. If possible, can you DM me a picture of the cover at Chain 8 Designs FB?
Hi Jennifer! I have always been a lover of unicorns, and was delighted when I found your pattern!! However, I am unable to get the pattern to print? Is there a trick to this, or is there another way I can get the pattern from you? I have 2 little girls to make them for, and can’t wait to get started! With all of the time at home now, due to the Corona Virus, I was hoping to get them made. Thanks so much for your time, and your generosity in sharing with others! Sincerely in crafting, Felicia
Hi Felicia! I’m glad you like the pattern. I’m working on a PDF of the pattern and should have it up late tonight or tomorrow morning.
Hi Felicia! I promise I haven’t forgotten about you. I am working on an easily downloadable/printable PDF right now. It will be up this evening. ? -Jennifer
Hi Felicia…the PDF is now up! I hope you and your girls love it. I would love to see when you’re done. Tag me on Instagram @chain8designs. Have a great weekend! Jennifer
Hi, I love your designs and right now am trying the unicorn headband as I have a granddaughter who loves all things unicorn. I am however having trouble with the ear portion of pattern specifically row two…2sc 2c?? Can you help.?
I’m sorry about that. It has been fixed. It is 2 SC, SC next 2, 2 SC… I hope that helps. ?