
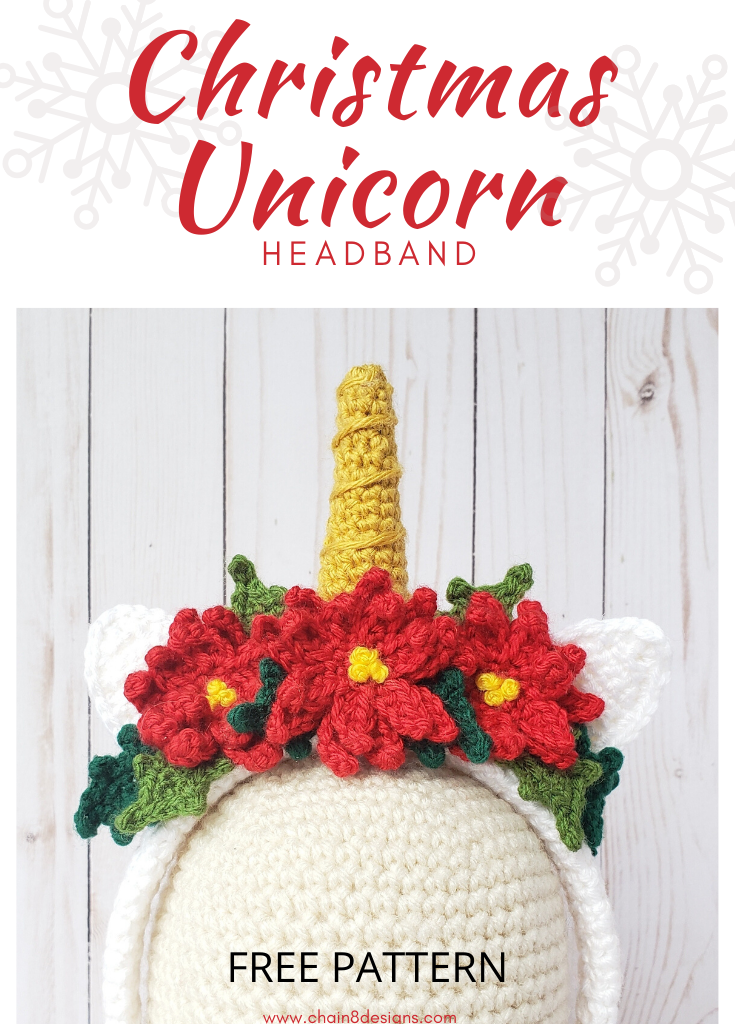
Christmas is a magical time of year. Do you know what is even more magical? A Christmas unicorn!!!! Move over reindeer…unicorns are the new magical Christmas beasts on the block.
If my daughter’s mind, unicorns are EVERYTHING! She will make sure that she points out every unicorn thing we see in a store. She might as well be holding a sign that says “HINT HINT MOM! This is what I want for Christmas!”
SHHH…don’t tell her but I got the hint and there might be few unicorn things under the tree this year. One of them will be this cute unicorn Christmas headband. She can prance around all Christmas day, living her best unicorn fantasy.
This would be a great Christmas gift for any unicorn loving child…or adult for that matter (we don’t just here…you live your best unicorn life). This would also look really cute in holiday photos. Think cute little unicorn frolicking amongst the Christmas trees.
Now on to the fun…how to make one of these cuties.
Don’t forget to check out my other holiday headbands!
Holiday Mouse Headband & Festive Reindeer Headband
WOULD YOU LIKE AN EASILY PRINTABLE/DOWNLOADABLE VERSION OF THIS PATTERN? NO ADS OR COMMENTS. YOU CAN PURCHASE A COPY ON RAVELRY.
The downloads help to support this site and make it possible for me to continue to bring you free patterns.
Thank you for your support!
DISCLAIMER: This post may contain affiliate links. I receive a small percentage from any purchases you may make (at no cost to you.)
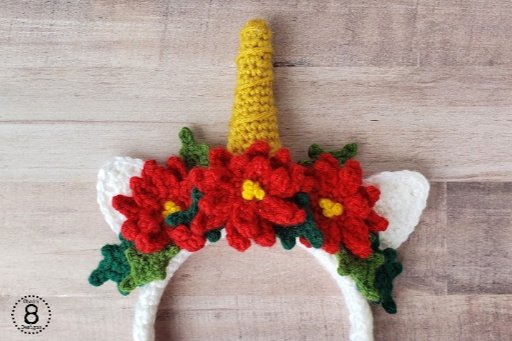
CHRISTMAS UNICORN HEADBAND
MATERIALS NEEDED:
- Size G Hook
- Size C Hook
- White Worsted Weight Yarn (Premier Everyday in Snow White)
- Gold Worsted Weight Yarn (Vanna’s Choice in Mustard)
- Dark Green Worsted Weight Yarn (Unknown Yarn)
- Red Worsted Weight Yarn (Premier Everyday in Really Red)
- Yellow Worsted Weight Yarn (Premier Everyday in Lemon)
- 1″ Plastic Headband
- Scissors
- Yarn Needle
- Stuffing
- Glue Gun & Glue Sticks
- Fabric Measuring Tape
- Sharpie
- Stitch Markers
ABBREVIATIONS:
- CH = Chain
- SC = Single Crochet
- SC2tog = Single Crochet Two Together
- SLst = Slip Stitch
- SSCF = Seamless Single Crochet Finish
- HDC = Half Double Crochet
- MR = Magic Ring
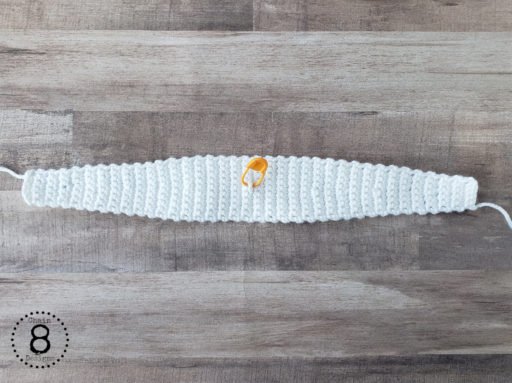
HEADBAND COVER
Notes:
- Use G Hook
- CH does NOT count as a stitch.
CH 6 (leaving a 12″ tail)
Row 1: SC in 2nd CH from hook; SC 4; CH 1; turn (5)
Row 2-6: SC all; CH 1; turn (5)
Row 7: SC next 2; 2 SC; SC next 2; CH 1; turn (6)
Row 8-10: SC all; CH 1; turn (6)
Row 11: SC next 2; 2 SC; SC next 3; CH 1; turn (7)
Row 12-15: SC all; CH 1; turn (7)
Row 16: SC next 3; 2 SC; SC next 3; CH 1; turn (8)
Row 17-20: SC all; CH 1; turn (8)
Row 21: SC next 4; 2 SC; SC next 3; CH 1; turn (9)
Row 22-25: SC all; CH 1; turn (9)
Row 26: SC next 4; 2 SC; SC next 4; CH 1; turn (10)
Row 27-47: SC all; CH 1; turn (10)
Row 48: SC next 4; SC2tog; SC next 4; CH 1; turn (9)
Row 49-52: SC all; CH 1; turn (9)
Row 53: SC next 3; SC2tog; SC next 4; CH 1; turn (8)
Row 54-57: SC all; CH 1; turn (8)
Row 58: SC next 3; SC2tog; SC next 3; CH 1; turn (7)
Row 59-62: SC all; CH 1; turn (7)
Row 63: SC next 3; SC2tog; SC next 2; CH 1; turn (6)
Row 64-66: SC all; CH 1; turn (6)
Row 67: SC next 2; SC2tog; SC next 2; CH 1; turn (5)
Row 68-71: SC all; CH 1; turn (5)
Row 72: SC all; fasten off leaving a 36″ tail (5)
EARS
Notes:
- Use G Hook
- Make 2 of each (Make the two ear backs first)
Back
CH 5
Row 1: SC in 2nd CH from hook; SC next 3; CH 1; turn (4)
Row 2: 2 SC; SC next 2; 2 SC; CH 1; turn (6)
Row 3-8: SC all; CH 1; turn (6)
Row 9: SC2tog; SC next 2; SC2tog; CH 1; turn (4)
Row 10: SC2tog; SC2tog; CH 1; turn (2)
Row 11: SC2tog; CH 1 (1); fasten off
Front
The front is made the same as the back except:
- Leave a 12-18″ tail before you start chaining.
- Once the ear is complete, DO NOT fasten off, we will be joining the front and back together.
Joining
Once you have completed the last stitch of the ear front, place the back ear behind the front. We will continue, single crocheting around the edge, making the two ear parts into one. Make sure that your stitches are going through both ear parts. Place a stitch marker on the first SC, continue to SC around the whole ear, placing 2 SC in both bottom ear corners. Once you have finished single crocheting around the end, finish with an SSCF to the first SC.


HORN
Notes:
- Use G Hook
- The horn is worked in-the-round. Make sure to place your stitch marker on the first stitch of each round so you don’t lose your place.
Magic Ring: 6 SC into magic ring
Round 1: SC all (6)
Round 2: 2 SC; SC 5 (7)
Round 3: SC all (7)
Round 4: 2 SC; SC next 6 (8)
Round 5: SC all (8)
Round 6: 2 SC; SC next 7 (9)
(At this point, pull the magic ring tight and weave in the end. It’s much easier to do at this point than it is once the horn is complete. We also want to attach the piece of yarn that goes around the outside of the horn that creates the faux ridges. Cut a 24″ piece of yarn. Take about 10″ of the 24″ and fold it in half. Tie two knots and cut off loop and short tail. This will help keep the yarn secure in the horn. Now insert the thread up through the middle of the horn. You can leave this piece to hang as you finish the rest of the horn.)
Round 7: SC all (9)
Round 8: 2 SC; SC next 8 (10)
Round 9: SC all (10)
Round 10: 2 SC; SC next 9 (11)
Round 11: SC all (11)
Round 12: 2 SC; SC next 10 (12)
Round 13: SC all (12)
Round 14: 2 SC; SC next 11 (13)
Round 15: SC all (13)
Round 16: 2 SC; SC next (14)
Round 17: SC all (14)
Round 18: 2 SC; SC next 13 (15)
Round 19: SC all (15)
Round 20: 2 SC; SC next 15 (16)
Round 21: SC all; fasten off leaving 18″ tail for attaching to headband cover (16)
HOLLY
- Use G Hook to make 2 large of each light and dark green
- Use G Hook to make 2 small of each light green and dark green
- Use C Hook to make 2 small of dark green
Small
CH 6
Round 1: SC in 2nd CH from hook; SC next 3; SC 3 in the last stitch; (working down the other side of the chain) SC next 4; SLst to first SC; CH 1
Round 2: SC in CH space; [SLst in next ; CH 3; SLst in 2nd CH from hook; SLst in next CH; SLst back into same SC space as CH]; SLst in the next; [SLst in next; CH 3; SLst in 2nd CH from hook; SLst in next CH; SLst back into same SC space as CH]; SLst in next; [SLst in next; CH 4; SLst in 2nd CH from hook; SLst in next 2; SLst back into same SC space as CH]; SLst in next; [SLst in next ; CH 3; SLst in 2nd CH from hook; SLst in next CH; SLst back into same SC space as CH]; SLst in the next; [SLst in next ; CH 3; SLst in 2nd CH from hook; SLst in next CH; SLst back into same SC space as CH]; SC next 2; SLst to first SC; fasten off; weave in ends


Large
CH 8
Round 1: SC in 2nd CH from hook; SC next 6; SC 3 in the last stitch; (working down the other side of the chain) SC next 7; SLst to first SC; CH 1
Round 2: SC in CH space; [SLst in next ; CH 3; SLst in 2nd CH from hook; SLst in next CH; SLst back into same SC space as CH]; SLst in the next; [SLst in next ; CH 3; SLst in 2nd CH from hook; SLst in next CH; SLst back into same SC space as CH]; SLst in the next; [SLst in next; CH 3; SLst in 2nd CH from hook; SLst in next CH; SLst back into same SC space as CH]; SLst in next; [SLst in next; CH 4; SLst in 2nd CH from hook; SLst in next 2; SLst back into same SC space as CH]; SLst in next; [SLst in next ; CH 3; SLst in 2nd CH from hook; SLst in next CH; SLst back into same SC space as CH]; SLst in the next; [SLst in next ; CH 3; SLst in 2nd CH from hook; SLst in next CH; SLst back into same SC space as CH]; SLst in the next; [SLst in next ; CH 3; SLst in 2nd CH from hook; SLst in next CH; SLst back into same SC space as CH]; SC next 2; SLst to first SC; fasten off; weave in ends
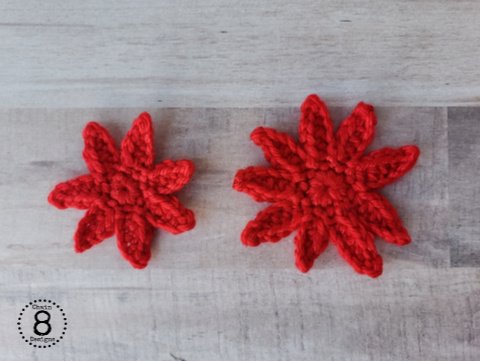
POINSETTIA
- Make 3 of each
- Use G Hook
Inner
Magic Ring: SC 8; SLst to first SC
Petals: CH 5; SLst to 2nd CH from hook; SC in next; HDC in the next 2; SLst to next SC in the MR; repeat until you have seven petals; on the last petal cut the yarn and pull through the loop; with your yarn needle, insert the yarn tail into the first SLst; pull your magic circle tight (to close the hole) and weave in the ends.
Outer
Magic Ring: SC 10; SLst to first SC
Petals: CH 6; SLst to 2nd CH from hook; SC in next; HDC in the next 3; SLst to next SC in the MR; repeat until you have nine petals; on the last petal cut the yarn and pull through the loop; with your yarn needle, insert the yarn tail into the first SLst; pull the magic circle tight (to close the hole) and weave in the ends.
Stack the inner poinsettia on top of the outer. Working through the middle of both magic ring circles, put three French knots. I used a four wrap French knot. If you don’t know how to make a French knot, there are many wonderful tutorials online.


Not ready to make right now?
Make sure to pin to Pinterest for later.

ASSEMBLY
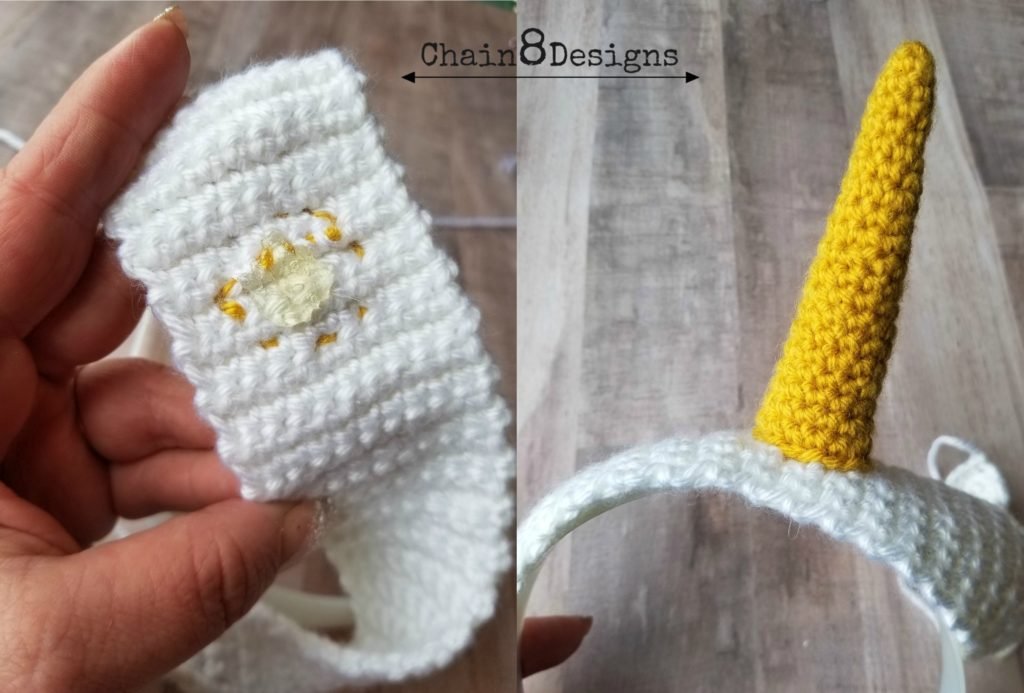
1. Stuff the horn until the horn will hold its shape and stand nicely on the headband without being floppy.
2. Find the middle point of your headband cover, position the horn, and stitch in place. You can use a few scrap pieces of yarn or stitch marker to hold the horn in place as you stitch.
3. Take the piece of yarn that is sticking out of the top of the horn and wrap it, at an angle, around the horn. To keep the yarn from moving, as you get to the back of the horn on each wrap, weave under a stitch to keep it in place.


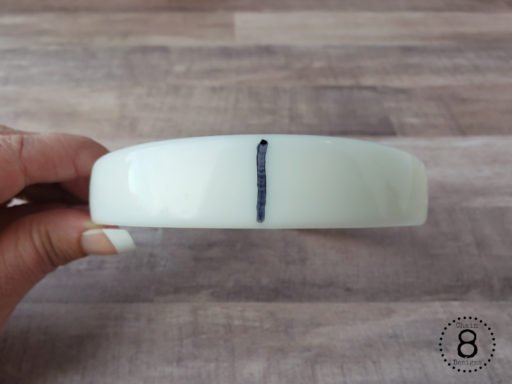
4. Take your fabric tape measure and measure the headband from tip to tip across the top. Take your sharpie and mark where the middle point of your headband is.
5. Starting with the CH tail side of the headband cover, fold the short end (right sides together) in half. Insert the needle into the corner opposite the tail and pull through. Whipstitch the short side closed then insert the needle under the stitches ending back where your tail originally started. You can leave the tail attached. We will enclose it when we close the cover. Now do the same with the other side.


6. To make sure that the horn stays perfectly centered on the headband, place a small amount of hot glue on the underside of the cover (where the horn is) and place on the headband, centering over the center line and making sure it is centered width-wise
7. Flip the seam you made while bringing the short ends of the cover together to the inside. This will create a little pocket for the ends of your headband to sit in. Slip the ends of the headband into the little pockets you just created and start to whipstitch the two long sides together, enclosing the headband. Do this until you have enclosed the whole of the headband, fasten off, and weave in end.


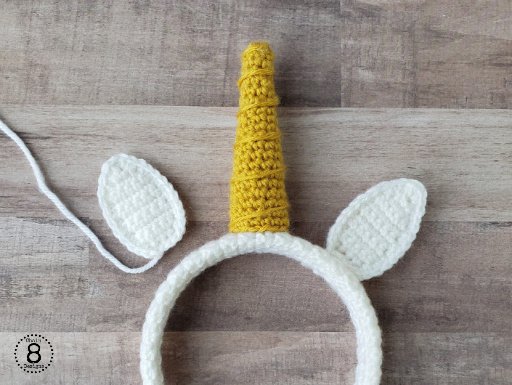
7. Place each ear about 7/8″ to 1″ from each side of the horn (centered in the middle of the headband) and sew in place. Placing a stitch marker or scrap piece of yarn will help hold the ears in place as you sew them down.
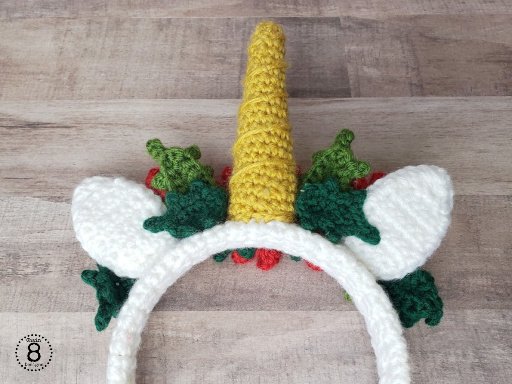
8. Now to add the poinsettias and holly leaves. You can sew them on or like I have, hot glue them on. I know that some people are opposed to using hot glue but after making many headbands, that have been put through their paces with a rough and tumble 5-year-old, I have had no problem with them holding up. Because of the placement of the flowers and leaves, it can be hard to sew them all on.
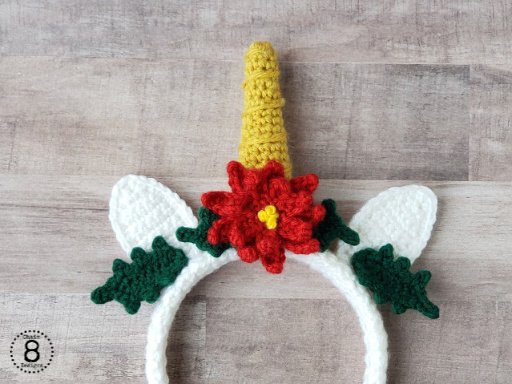
Glue the two holly leaves (small light and large dark green) to the ears first, then place two small dark green hollies, facing opposite directions, at the base the horn. Attach a poinsettia over the leaves on the horn. Next, tuck the two large light green hollies at the back between the horn and ears and then place the other poinsettias in front of those and behind the center poinsettia (making sure that the overlapped the ear a little.)
Once you have everything initially glued down, go back and move things around a bit to see where things aren’t attached very well. Place a few dots of glue to make sure that everything is very secure.
To put the finishing touch on and to give the back a nice and tidy look, take the small dark green holly leaves and place them in the spaces between the horn and ears. Make sure the hollies are glued to both the ears and horn. This will cover the back of the large light green hollies and add extra support for the front.


I hope that you love this new headband as much as I do. If you happen to make one of these cute little headbands I would love to see. Please tag me on Instagram or use #chain8designs. I hope everyone has a fantastic
Thanksgiving and till next time…HAPPY HOOKING!

**Feel free to make and sell items that are made from this pattern. Please link back to the pattern on any online sales or include my web address on tags for any in-person sales. Please do not republish or distribute any of the pictures or patterns, in any form, from this site without permission from me. Please e-mail me for any inquiries.**
Add a Comment