ADD A MODERN BOHO TOUCH TO YOUR HOME DECOR TODAY!
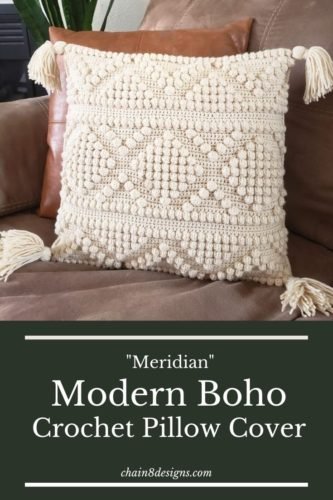
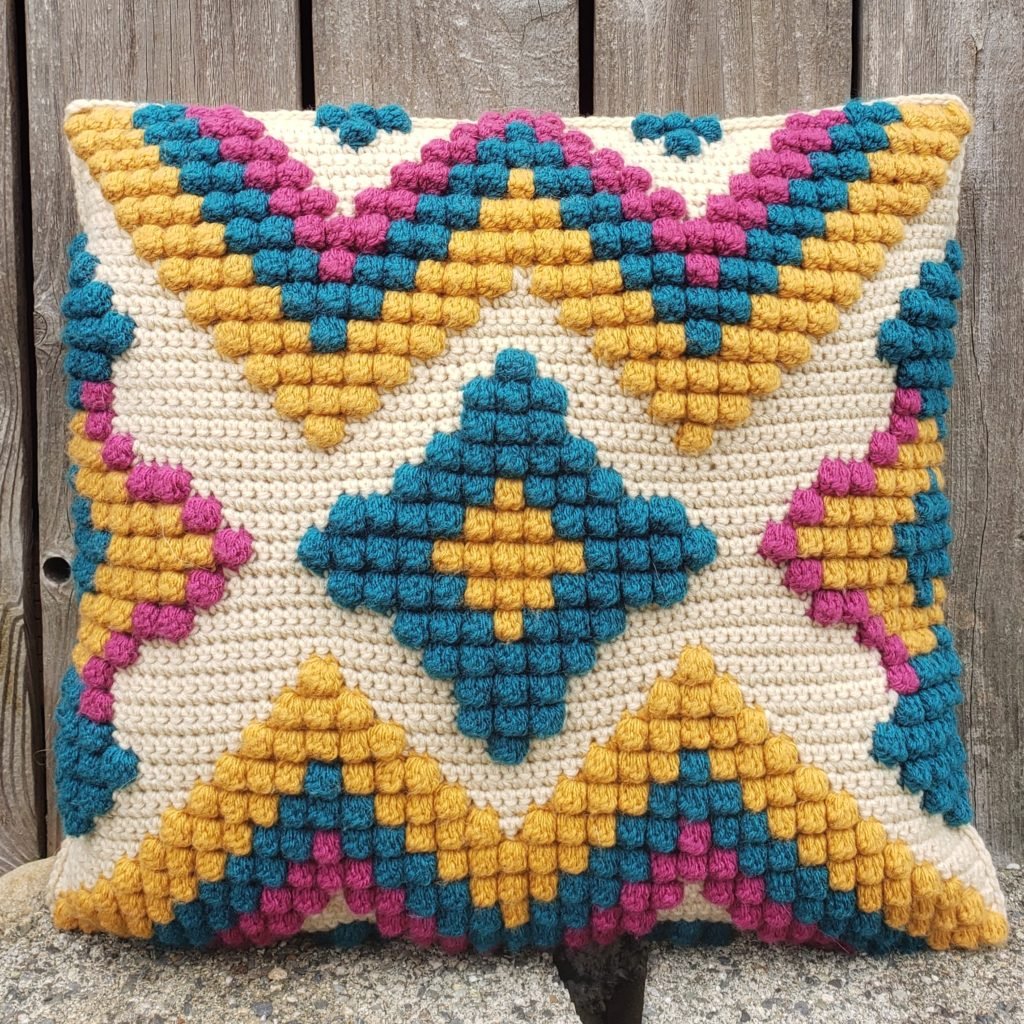
As you may have noticed, bohemian style has made a huge resurgence in home décor in the last couple of years. Whether your style is on the minimal side or the more eclectic, this modern boho crochet pillow cover is perfect for you.
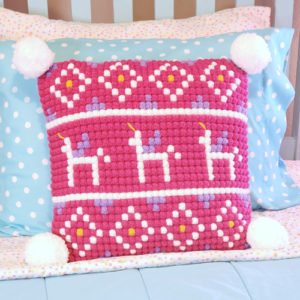
The front cover is made with a mixture of bobble stitches and single crochets, which give this pillow a great nubby texture. The cover has a button closure that makes removal and cleaning a breeze.
Make a cover today and add a touch of boho to your home decor!
WOULD YOU LIKE AN PRINTABLE AND DOWNLOADABLE VERSION OF THIS PATTERN?
NO ADS OR COMMENTS.
PURCHASE A COPY ON RAVELRY TODAY!
The downloads help to support this site and make it possible for me to continue to bring you free patterns.
Thank you for your support!

UPDATE (6/1/23): Chart #2 has been updated to fix an error.:
DISCLAIMER: This post may contain affiliate links. I receive a small percentage from any purchases you may make (at no cost to you.)
MATERIALS NEEDED:
- 810 yards Worsted Weight Yarn
- Size G Hook [4.00 mm]
- 18″ x 18″ Pillow Form
- Yarn Needle
- Scissors
- (5) 7/8″ Buttons
- 5 1/2″ x 4″ Piece of Cardboard
- Stitch Marker [optional]
Color Notes:
The pattern works best in a light color. You lose a lot of the definition between the bobble and single crochet sections if you use a darker color.
The Yarn I Used:
Big Twist Value in Cream
ABBREVIATIONS:
- Bob = Bobble
- CH = Chain
- HDC = Half Double Crochet
- SC = Single Crochet
- SK = Skip Stitch
- SSCF = Seamless Single Crochet Finish
- YO = Yarn Over
GAUGE:
- 4 Bobble Stitches x 4 Rows = 2″ x 2″
- 17 HDC x 13 Rows = 4″ x 4″
FINISHED MEASUREMENT:
- 17″ x 16 1/2″
NOTES BEFORE YOU BEGIN
- The front cover is made using the bobble stitch. If you have never worked with the bobble stitch before or need a refresher, please read the my Bobble Stitch Tutorial.
- Please read each section carefully. There are notes and suggestions to help you along the way.
- Make sure to complete the gauge swatches before you begin. Not everybody’s tension is the same and not all worsted weight yarn is created equal, and both can affect the overall size of your finished project.
- How your cover fits will depend on your individual pillow forms. For my final pillow cover, I used a moderately stuffed pillow form that measured 18″ x 18”, and the cover had a nice snug fit. If you know that your pillow form is on the fuller side, you might want to go up a hook size to accommodate that.
- If you have any questions about this pattern, please don’t hesitate to e-mail me at chain8designs@gmail.com. Put the pattern name as the subject line and I will get back to you as soon as I can. You can also send me a message on Facebook through the Chain 8 Designs page. I want everyone to enjoy making this pattern, so don’t hesitate to contact me if you have any questions or problems along the way. I’m always here to help.
PATTERN PIECES
FRONT COVER
To make the front cover, we will be following one of the two charts below. Pick the chart that works best for you.
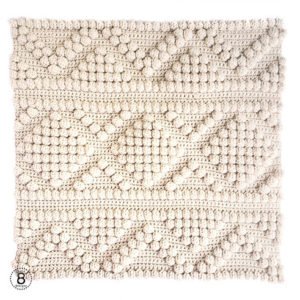
Chart #1

This chart is like a traditional bobble chart, where each square represents one (1) bobble.
The lighter color represents the bobbles, and the darker color represents the SC sections.
You need to remember that a bobble stitch is made of four (4) stitches [2 SC on the first row and a bobble and SC on the second row]. And when you are working in the SC sections, you are doing the same four stitches but all in SC.
It can be easy to get in the bobble groove and forget to change back to SC. I do it all the time and had to frog so many rows. LOL
Chart #2
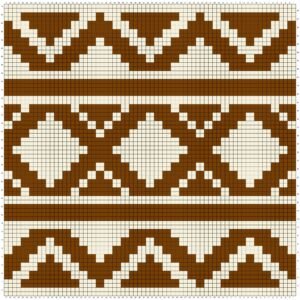
Some might find this chart easier to follow.
This chart shows the total stitch count. Each square represents one (1) stitch. The lighter sections show the four (4) stitches that make up the bobble stitches and the darker sections show the single crochets.
The odd numbered rows are single crochet rows, and the even numbered rows are the bobble rows.
The row numbers are hard to see, so it might be helpful to cross off rows as you go, or like I do, fold the pattern to the row you are currently working on.
For those that are not used to working from a bobble chart, I will walk you through a few rows to help get you started.
If you are working for CHART #1: Because each square of the chart is one bobble stitch [and each bobble stitch is made up of two rows], each row will have a part one (single crochet row) and a part two (bobble stitch row) i.e., Row 1/1 and Row 1/2. Once you have Row 1/1 and Row 1/2 done, you will have completed Row 1 of Chart #1 and so on.
If you are working from CHART #2: Because Chart #2 shows each individual row, the rows below will be Rows 1-8 on Chart #2.
CH 71
Row 1/1: SC in 2nd CH from hook; SC next 69 stitches; CH 1; turn (70)
Row 1/2: [*Bob; SC]; repeat * till end (70)
Row 2/1: SC all; CH 1; turn (70)
Row 2/2: [Bob; SC] x2; SC x14; [Bob; SC] x2; SC x2; [Bob; SC] x2; SC x14;[Bob; SC] x2; SC x2; [Bob; SC] x2; SC 14; [Bob; SC] x2; CH 1; turn (70)
Row 3/1: SC all; CH 1; turn (70)
Row 3/2: SC 2; [Bob; SC] x2; SC 10; [Bob; SC] x2; SC 6; [Bob; SC] x2; SC 10; [Bob; SC] x2; SC 6; [Bob; SC] x2; SC 10; [Bob; SC] x2; CH 1; turn (70)
Row 4/1: SC all; CH 1; turn (70)
Row 4/2: SC 4; [Bob; SC] x2; SC 6; [Bob; SC] x2; SC 10; [Bob; SC] x2; SC 6; [Bob; SC] x2; SC 10; [Bob; SC] x2; SC 6; [Bob; SC] x2; SC 4; CH 1; turn (70)
Continue to follow the chart until complete; fasten off and weave in ends.
LARGE BACK PIECE
The large back piece is the main back cover and will have buttonholes at the bottom.
The finished measurement should be the same as the front cover (17″ x 16 1/4″). After you have completed the first few rows, measure this piece to your front cover. If you find that yours is too narrow/too wide, increase/decrease your hook size accordingly. I would NOT add or remove stitches though, a change in hook size should do the trick.
CH 72
Row 1: HDC in 3rd CH from hook; HDC next 69; CH 2; turn (70)
Row 2-48: HDC all; CH 2; turn (70)
Row 49: HDC all; CH 1; turn (70)
Row 50: SC next 10; [*CH 2; SK 2; SC next 10]; repeat [*] four more times; CH 1; turn (70)
Row 51: SC all; CH 1; turn (70)
Row 52: SC all; fasten off; weave in ends (70)
SMALL BACK PIECE
The small back piece is what we will be attaching the buttons to.
This piece should also be as wide as the front cover, 17″ and the height is 2″.
CH 72
Row 1: HDC in 3rd CH from hook; HDC next 69; CH 2; turn (70)
Row 2-5: HDC all; CH 2; turn (70)
Row 6: HDC all; fasten off; weave in ends (70)
ASSEMBLY
NOTES:
- To assemble the pillow, we will be running a row of SC around the whole edge of the pillow.
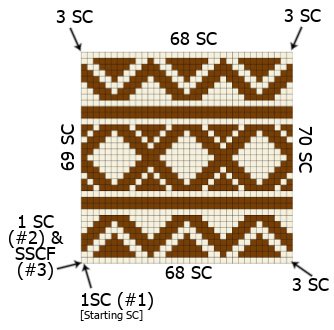
- We will be putting three (3) SC in each corner. As there is no real corner stitch, the corner stitches will be the first and last stitches of the top and bottom edges. [See the ATTACHING THE LARGE BACK PIECE section below for an example.]
ATTACHING THE SMALL BACK PIECE
- Begin by laying the front cover face down and aligning the small back piece along the bottom edge. You can place a few stitch markers to hold it in place.
- Flip the cover over so the front cover is facing you.
- Insert your hook in the first stitch of the right-hand corner (going through both the front cover and small back piece) and pull up a loop, YO, and pull through the loop; SC into the same stitch space [this is your first counted stitch]. Continue to SC along the bottom edge, putting 1 SC in the last stitch. You should have a total of 70 SC at this point.
- Leave the yarn attached and move to the Attaching the Large Back Piece section.

ATTACHING THE LARGE BACK PIECE
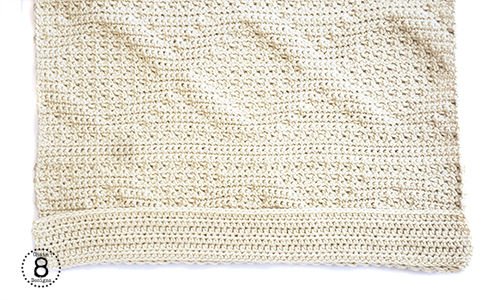
- Flip the cover back over so the front cover is face down.
- Lay the large back piece over the front cover (making sure the buttonholes are at the bottom.)
- Place either stitch markers or scrap pieces of yarn around the edge to keep the piece in place.
- Flip the cover back over so the front cover is facing up.
- SC into the same space as the last SC from attaching the small back piece, going through the front cover, small back piece, and large back piece. Now place one more SC in the same stitch space. This will complete the three (3) SC for this corner.
- Next, SC 70 stitches up the side.
[Make sure for the part where the side of the small back piece is, that you are crocheting together only the front cover and large back piece. Not crocheting the small back piece at the sides will aid in attaching the buttons.] - Place 3 SC in the first stitch of the top edge, then continue to SC 68 stitches across the top until you reach the last stitch, where you will place the 3 SC for that corner.
- SC 69 stitches down the other side.
- Place the last SC in the same space as the very first SC stitch. This will create the second stitches for that corner. You should now have 286 SC.
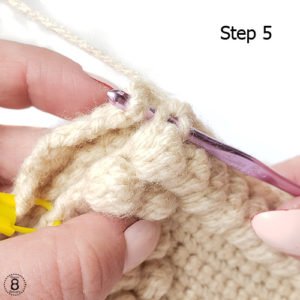
- Finish with an SSCF to the very first SC. This creates a faux third SC for this corner. Finish by weaving in the ends.
ATTACHING THE BUTTONS
- Lay the cover face down and smooth it out.
- Pull the large back piece down so that the bottom edge aligns with the bottom edge of the front cover/small back piece.
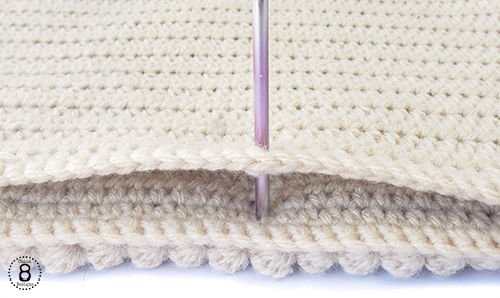
- Insert the non-hook end of your crochet hook into the center of the middle buttonhole.
- Without removing the hook, lift the large back piece. This will show you where you will place the first button.
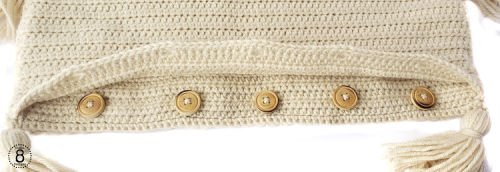
- With your yarn needle, thread your needle from the backside to where your crochet hook is. Remove your hook and attach the button.
- Repeat until you have attached all five buttons.
TASSELS
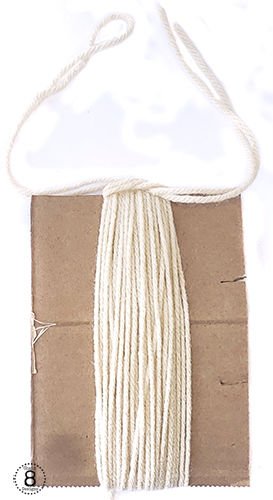
- Cut a 5 1/2″ x 4″ piece of cardboard. We will be wrapping the yarn around the long side.
- Wrap the yarn around the cardboard 40 times.
- Cut a 30″ piece of yarn, fold in half, and thread on your needle. Insert the needle under the yarn wraps and pull it to the top of the wraps and tie in a loose knot.
- Remove the yarn from the cardboard and pull the yarn ties tight and double knot. These will be the ties you use to attach the tassel to the pillow.
- Cut the tassel loops open.
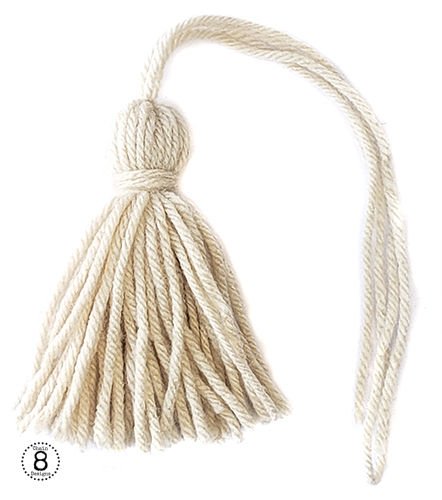
- Cut a 30″ piece of yarn and lay flat. Place the tassel on top with the piece of yarn approximately 3/4″ to 1″ down from the top of the tassel and tie tightly. Flip the tassel over and double knot the ties.
- To hide the knot, take one yarn tail and wrap it around the tassel where you just tied it. Do this about 5 times and then thread the end onto your needle and insert it under the wraps from the top and pull through.
- Now trim your tassel approximately 3″ down from where you just wrapped the yarn around.
- Repeat Steps 1-8 till you have 4 tassels.
- Attach the tassels to each corner of your pillow cover and weave in the ends.
Once your cover is complete, the last thing to do is to insert your pillow form and close the buttons. Now you can stand back and admire the beautiful work you did.
GO YOU!
Till next time…HAPPY HOOKIING!

**Feel free to make and sell items that are made from this pattern. Please link back to the pattern on any online sales or include my web address on tags for any in-person sales. Please do not republish or distribute any of the pictures or patterns, in any form, from this site without permission from me. Please e-mail me for any inquiries.**




Hi Jennifer, the pillow cover is beautiful and instructions are clear. I’m just wondering how many stitches in the bobble itself. Tutorial said various numbers could be used (3,4,5 or more). Thanks
Thank you! It’s a five stitch bobble. 🙂
Hi Jennifer,
I’m new to crocheting and I’m still learning the verbiage and how to follow instructions. I’m looking at Chart #2 and I’m getting confused. It said that odd rows are SC and even rows are bobbles but rows 1 and 2 looks like they’re both bobbles based on the color chart. Please help. Thank you.
Hi! I can see where that might not be very clear. Row 1 is a row of all single crochet and Row 2 is a bobble row. Once those two rows are completed, you will have ONE row of completed bobble stitches. Remember the bobble stitch is made up of 4 stitches total (two single crochet on the first row and the “bobble stitch” and single crochet on the second row. The darker sections on chart #2 show the sections where you will NOT bobble on the second row. I hope that helps.
Would you consider making YouTube videos for your crochet projects? I am slowly learning and I have trouble reading patterns, but LOVE your designs! I’m also much more of a visual person, so I find videos to be very helpful! I’m loving the boho projects!!
I have considered it but unfortunately haven’t had as much time as I would like to dedicate to learning the ins and outs yet.
[…] […]
Thanks for the pattern Jennifer! I have some 20×20 inserts – do you have any tipa on how to adjust the pattern to fit? I always find it difficult to figure that out!
– Toni
Hi Toni,
My best advice would be to work up the HDC swatch until you reach the gauge stated and then go up a hook size, more likely two sizes, from the hook you used to obtain gauge. Once you have that done, I would work up three or four rows of the chart and then measure the width. You should be somewhere close to 19″, a little under is okay but I wouldn’t go past 19″.
I hope that helps!
-Jennifer
[…] original free pattern on chain8designs.com, or read more about […]
I’m excited to make 2 of these for my couch. I’ve needed an update for a while.
Thank you!
You’re welcome. I’m so glad you like it! I really need to make a second one for our couch. It will happen one of these days. Lol